Integrating to internal infrastructure with Broker
Published on December 20th, 2022Introduction
The Broker connection is designed to connect Roadie and its plugins to integration targets that are located on self-hosted infrastructure and therefore not publicly available via the internet.
At a Glance
| Prerequisites | |
| Considerations | |
| Supported Environments | ☐ Private Network via Broker ☐ Internet Accessible via IP Whitelist ☒ Cloud Hosted |
Overview
The broker is a Node.js service that you run inside your infrastructure to provide a secure tunnel for Roadie traffic. It was originally created by security company, Snyk , and is open-source. We are actively using it with existing customers for Kubernetes API access and other Backstage and Roadie plugins. You don't need to be a Snyk user to use the broker.
The benefits of the broker include:
- You can allow list what Roadie can access using a config file.
- Any tokens for the internal endpoints stay in your infra. They are not shared with Roadie.
- The broker maintains an audit log of what we access.
- The connection is established outbound from your side. We cannot re-establish the connection on our own if you kill it.
Tested Versions
We regularly test the latest version of the broker client as they are released to ensure there are no issues. The latest tested version with no issues is 4.207.0.
Broker Architecture
Broker connection consists of two similar services called broker server and a corresponding broker client.
Client
A node.js application creating a websocket connection to its counterpart, broker server hosted in Roadie infrastructure.
Server
A tenant specific broker server accepting websocket handshakes and directing traffic through from Roadie instance via the socket to the broker client.
The broker connection itself keeps an open websocket identified by a broker token which can be specified by the client trying to establish a connection. The traffic flows through this websocket and is filtered on both ends, broker server and broker client, using an 'accept.json' configuration file. This configuration file also determines where requests are forwarded to and if they need additional headers to be injected to the request.
This way Roadie does not need to have knowledge or access of your infrastructure endpoints nor authorization tokens.
Setup Broker Server
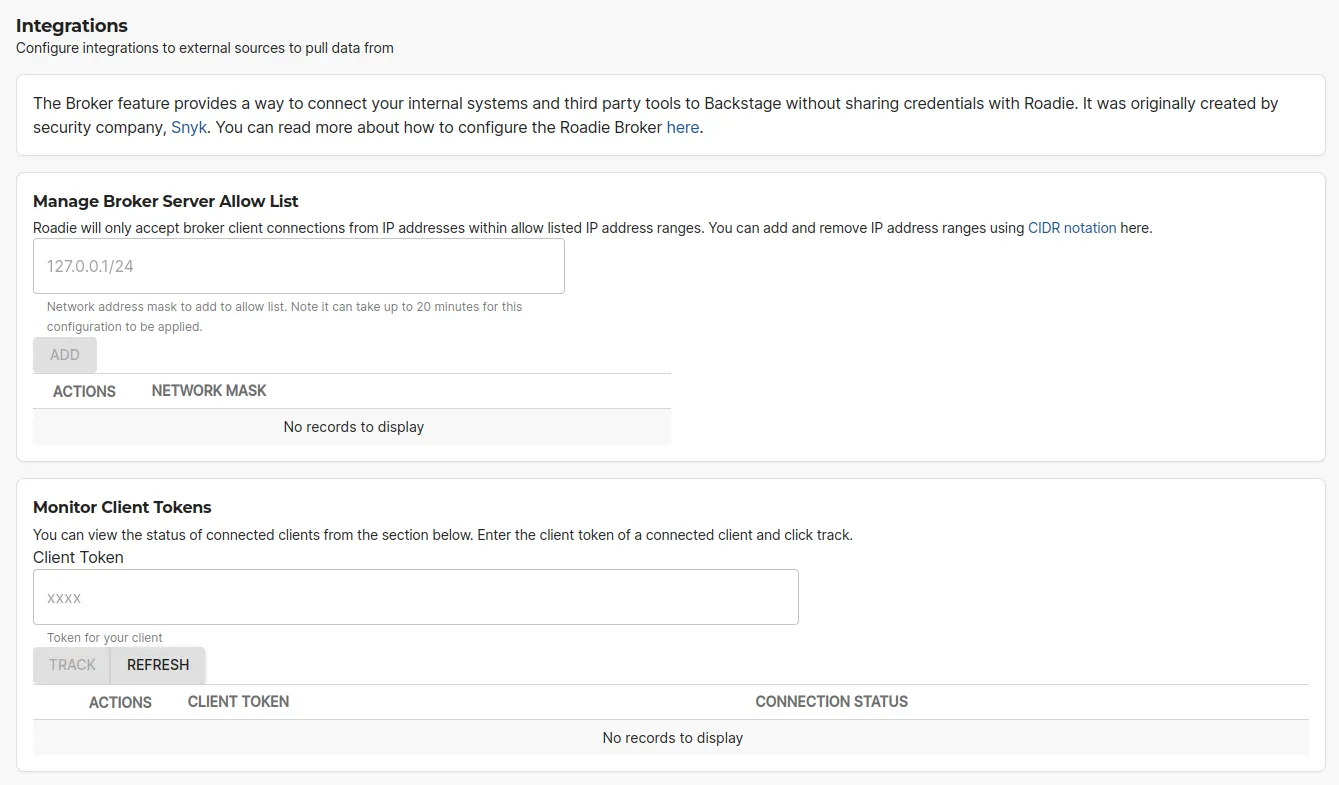
- Navigate to
https://<tenant-name>.roadie.so/administration/settings/integrations/brokerand enter the CIDR range of the system you wish to connect your Roadie Tenant’s Broker Server to. Next enter the Broker Token you wish to use to authenticate the connection. This token will be used in youraccept.jsonfile at Client configuration.
Note: configuration is case insensitive and will automatically be normalised, so avoid uppercase characters. For example, if 'testRoadie' is used that token name will be constructed in the broker server as test-roadie, without clear error reporting. Full documentation can be found here: https://github.com/snyk/broker/blob/master/README.npm.md#configuration
Setup Broker Client
When configuring the Broker Client, you have multiple options:
- Helm Charts: Deploy one of the pre-configured Docker containers provided by Roadie
- Roadie Docker Container: Deploy a pre-configured Docker container into a Kubernetes cluster using a Helm chart
- Snyk Broker CLI: Run the broker client NodeJS application
- Custom Docker Container: Build a custom Docker container
Helm Charts
If you are running Kubernetes you can simplify things further by deploying via one of our Helm charts.
We have a generic Broker chart that allows the use of any of the Docker images listed above, and a Kubernetes specific chart .
Usage instructions can be found in the respective README.md files.
Roadie Docker Containers
Roadie provides pre-configured Docker containers containing pre-configured broker clients for use with backstage. At time of writing, we are providing container images for Kubernetes, Sonarqube, Jenkins, Cost Insights, GitHub Enterprise Server and ArgoCD. These can be found on GitHub here .
The individual built images can be also found from Dockerhub .
You can configure them with environment variables containing authentication credentials for the brokered service as well as the broker endpoint and the broker client token.
e.g. To run the kubernetes client you can run the Docker container as follows:
docker run \\
   -v "$(pwd)"/certs:/var/lib/certs:ro \\
  --env CA_CERT=/var/lib/certs/ca.cert \\
  --env K8S_SERVICE_ACCOUNT_TOKEN=service-account-token \\
  --env BROKER_TOKEN=kube-api \\
  --env BROKER_SERVER_URL=https://<tenant-name>.broker.roadie.so \\
  roadiehq/broker:kubernetes
Snyk Broker CLI application
The broker client is published as an npm package available to be downloaded, installed on run on a machine configured to run NodeJS packages.
Install
npm install --global snyk-broker
Run
BROKER_TOKEN=test \\
BROKER_SERVER_URL=https://<tenant-name>.broker.roadie.so \\
PREFLIGHT_CHECKS_ENABLED=false \\
npx snyk-broker --disableBodyVarsSubstitution --disableHeaderVarsSubstitution
In order to do something meaningful with the broker client you will need to configure and accept.json file documented in a section below.
Run with accept.json file
ACCEPT=accept.json
BROKER_TOKEN=test \\
BROKER_SERVER_URL=https://<tenant-name>.broker.roadie.so \\
PREFLIGHT_CHECKS_ENABLED=false \\
broker --disableBodyVarsSubstitution --disableHeaderVarsSubstitution
Custom Docker container
You could also build your own container that builds the accept.json and broker client into. This is out of the scope of this document. But you can take inspiration from the roadiehq/broker container images on docker hub.
Configure Broker Client
The Broker client is configured with an accept.json file and environment variables set in the file. The file contains endpoint routing paths definitions determining where the requests coming from Roadie should be forwarded to. The configuration file also acts as a filtering mechanism to block non-allowed requests and as a request decorator to enhance request headers with possible auth information.
Roadie can provide configuration files for plugins which can be used to forward traffic to endpoints the plugins are using. You can find a broker configuration file section on each of the plugins documentation pages. If some plugin is missing a configuration file, you can request the support to provide you with one.
Configuration file structure
An example accept.json looks like the following:
{
  "private": [
    {
      "//": "Show results of my plugins API",
      "method": "GET",
      "path": "/api/show",
      "origin": "${MY_PLUGIN_REST_ENDPOINT}",
      "auth": {
        "scheme": "bearer",
        "token": "${MY_PLUGIN_AUTH_TOKEN}:"
      }
    }
  ],
  "public": [
    {
      "//": "Get broker connection status",
      "method": "GET",
      "path": "/healthcheck"
    }
  ]
}
The file is divided into 2 parts, public and private.
The public configuration block defines what endpoints can be called when calling the broker client endpoint directly. This would be for cases where an internal infrastructure would need to send data via the broker client toward Roadie instances. This is rarely used since most Backstage and Roadie plugins make requests and expect a response.
The private configuration block defines what requests are allowed to come through via the connected broker websocket connection and where they are forwarded to. In the example above we are allowing traffic to flow to a single endpoint matching an imaginary service we have developed. We are hosting this custom imaginary service in our own infrastructure behind a corporate firewall in a private network and it's APIs are accessible when using bearer token authentication. The service exposes a single GET endpoint with a path /api/show. With this configuration the broker client would allow Roadie plugins to contact the imaginary service, via the broker connection, in cases where the request is going to the defined endpoint using a GET request and nothing else.
The best way to configure endpoints and tokens via environment variables. In the above example the accept.json file is expecting two variables, MY_PLUGIN_REST_ENDPOINT and MY_PLUGIN_AUTH_TOKEN.
Configuration options
Below you can find a table of configuration options available in the accept.json file.
| Key | Example values | Description |
|---|---|---|
| // | Any string | Denotes a comment on the configuration file |
| method | HTTP Methods (GET, POST, PUT, DELETE, etc.) or any | HTTP Method to be used as a filter on the request |
| path | /my-plugin/endpoint | Endpoint path to accept requests to. Only request going to these endpoints are forwarded. You can use _ as a wildcard, e.g. /my-service/components_ |
| origin | https://my-service.myinternaldomain.com/ | The origin host to forward the request to. This is only available on the private configuration block. |
| auth | {"scheme": "bearer", "token": "my-secret-token" } | Auth scheme and value to use to overwrite any auth header coming from the original request. See auth scheme options from the table below. This is only available on the private configuration block. |
Authorization Scheme configuration:
| Scheme value | Value input key | Example | End result |
|---|---|---|---|
| token | token | { "scheme": "token", "token": "my-secret-token" } | Authorization: Token my-secret-token |
| bearer | token | { "scheme": "bearer", "token": "my-secret-token" } | Authorization: Bearer my-secret-token |
| basic | token or username and password | { "scheme": "basic", "token": "my-secret-token" } or { "scheme": "basic", "username": "user", "password": "pass" } | Authorization: Basic bXktc2VjcmV0LXRva2Vu (base64 encoded token) or Authorization: Basic dXNlcjpwYXNz (base64 encoded user:pass) |
An additional filtering based on any header can be achieved by using valid configuration block in the configuration file.
"valid": [{
  "header": "my-header-key",
  "values": ["my-super-secret-header-key-value"]
}]
Troubleshooting
Error: self-signed certificate in certificate chain
If the services you are directing traffic to are using self-signed certificates you might face an issue where the broken healthcheck does not respond correctly, varying between 403 and 404 error codes. To fix this, you can either provide the certificate to the broker manually so it understand that or alternatively disable certification verification altogether .
Using a self-signed certificate within broker running in K8s
If you want to continue using self-signed certificates and are not comfortable disabling the certificate validation completely, you can attach the self-signed certificate as a file to the running instance and reference it with an environment variables. This way the node.js process is able to accept self-signed certificates also. The steps to set this up are as follows:
-
Either generate (or re-purpose) a ConfigMap with the private Root & Intermediate CA
-
yaml
---
volumes:
  - name: trusted-ca-bundle
configMap:
name: ca-bundle
-
-
Add the volume to the Deployment Configuration and mount the volume in a specific path
-
yaml
... volumeMounts: - name: trusted-ca-bundle mountPath: /private -
This will be mount the
trusted-ca-bundlevolumen into/private/folder of the pod, and the name of the file will be the name of the key in the ConfigMap
-
-
Configure the environment variable for Node.JS - see below.
-
yaml
--- - env: --- - name: NODE_EXTRA_CA_CERTS value: '/private/ca-bundle.pem' -
The key in the ConfigMap is named ca-bundle.pem and the ConfigMap itself is named ca-bundle
-
Debugging
Here are the main debugging questions you need to ask when investigating issues with the Broker connection for a plugin.
- Is your Broker client connecting to the Roadie Broker Server?
- Navigate to the Broker settings, and at the bottom, add your broker token and click track. You should then see if your Broker client is connected to Roadie or not.
- Is the traffic coming to your Broker client from Roadie showing in your client logs and are there any errors you can see?
- Deploy your Broker client with a
LOG_LEVELenvironment variable set todebug - Try using the plugin that should be connecting to your Broker client and see if any requests are coming through in the logs. i.e.
kubectl logs <broker-pod-id> -n <broker-pod-namespace> -f
- Deploy your Broker client with a
- Is there an issue with the requests being proxied on by your Broker client - i.e. do the routes being requested match the
accept.jsonroutes you have defined. - Are you able to curl the API you are trying to reach from your Broker client i.e.
kubectl exec -it <broker-pod-id> -n <broker-pod-namespace> bash
> curl -v "${CLUSTER_ENDPOINT}/api/v1/pods?labelSelector=app=customers-api" -H "Authorization: bearer ${K8S_SERVICE_ACCOUNT_TOKEN}"