Configuring AWS Resources Autodiscovery
Published on March 29th, 2022Introduction
Roadie has the capability to automatically ingest resources from AWS. This is done by automatic discovery and currently ingests all configured resource types per AWS region. You can configure AWS resource ingestion either by manually adding standalone account/region configurations or by using AWS organization structure to autodiscover accounts and their resources. The discovered AWS resources will be registered as Resource kind entities within Roadie. The type of the Resource entity indicates the AWS resource type.
This guide describes how to set up Roadie to access your specific AWS resources and automatically ingest them.
At a Glance
| Prerequisites | |
| Considerations | |
| Supported Environments | ☐ Private Network via Broker ☐ Internet Accessible via IP Whitelist ☒ Cloud Hosted |
Configuring connectivity to AWS
Step 1: Get the roadie IAM details
Navigate to Administration > Settings > AWS Resources and make a note of the Roadie backend role ARN and account ID. This is mentioned on the title text of the AWS Resources integration settings page.
Step 2: Create a federated role in your account for Roadie
Follow the steps here to create the role.
You'll need to attach policies to the role to be able to retrieve information about the resources you want ingested. The supported resources and their policies are listed in a table at the end of this page. You can use the same role for multiple resource types as long as the needed permissions are granted to it.
For quick experimentation, you can use AWS<ResourceType>ReadOnlyAccess policies provided by AWS, but the best practice is to allow only specific operations. You can see the needed policies in a table at the end of this page.
Step 3: Configure external id
It is best practice (and mandatory for autodiscovery configuration) to configure an external id for your assumable role.
(A)
For Autodiscovery configuration, you are able to define an external id prefix within the Roadie application. The final external id will be constructed based on this prefix, a delimiter character of - and the AWS account number in question, encoded into a base64 string.
For example if you have defined external id prefix roadie and the account id is 123456789012 the final external id will be cm9hZGllLTEyMzQ1Njc4OTAxMg==. The preferred way for these is naturally creating the roles and their configurations using infrastructure as code tools. The following approaches can be used for specific tools:
- Terraform:
base64encode("roadie-123456789012") - Pulumi (JS/TS):
Buffer.from('roadie-123456789012').toString('base64') - Bash:
echo -n 'roadie-123456789012' | base64 - Browser Devtools:
btoa("roadie-123456789012")
(B)
For standalone configurations this can be any string conforming to regular expression pattern [\w+=,.@:\/-]*.
Example trust policy
{
  "Version": "2012-10-17",
  "Statement": [
    {
      "Effect": "Allow",
      "Principal": {
        "AWS": "arn:aws:iam::123456789012:root"
      },
      "Action": "sts:AssumeRole",
      "Condition": {
        "StringEquals": {
          "sts:ExternalId": "cm9hZGllLTEyMzQ1Njc4OTAxMg=="
        },
        "StringLike": {
          "aws:PrincipalArn": "*role/demo-role-abcdABCD*"
        }
      }
    }
  ]
}
The values 123456789012 and demo-role-abcdABCD can be replaced with the values found within your Roadie instance, the external id is the value from step 3.
Configuring your Roadie instance to discover AWS resources
Option 1 - Standalone AWS account configuration
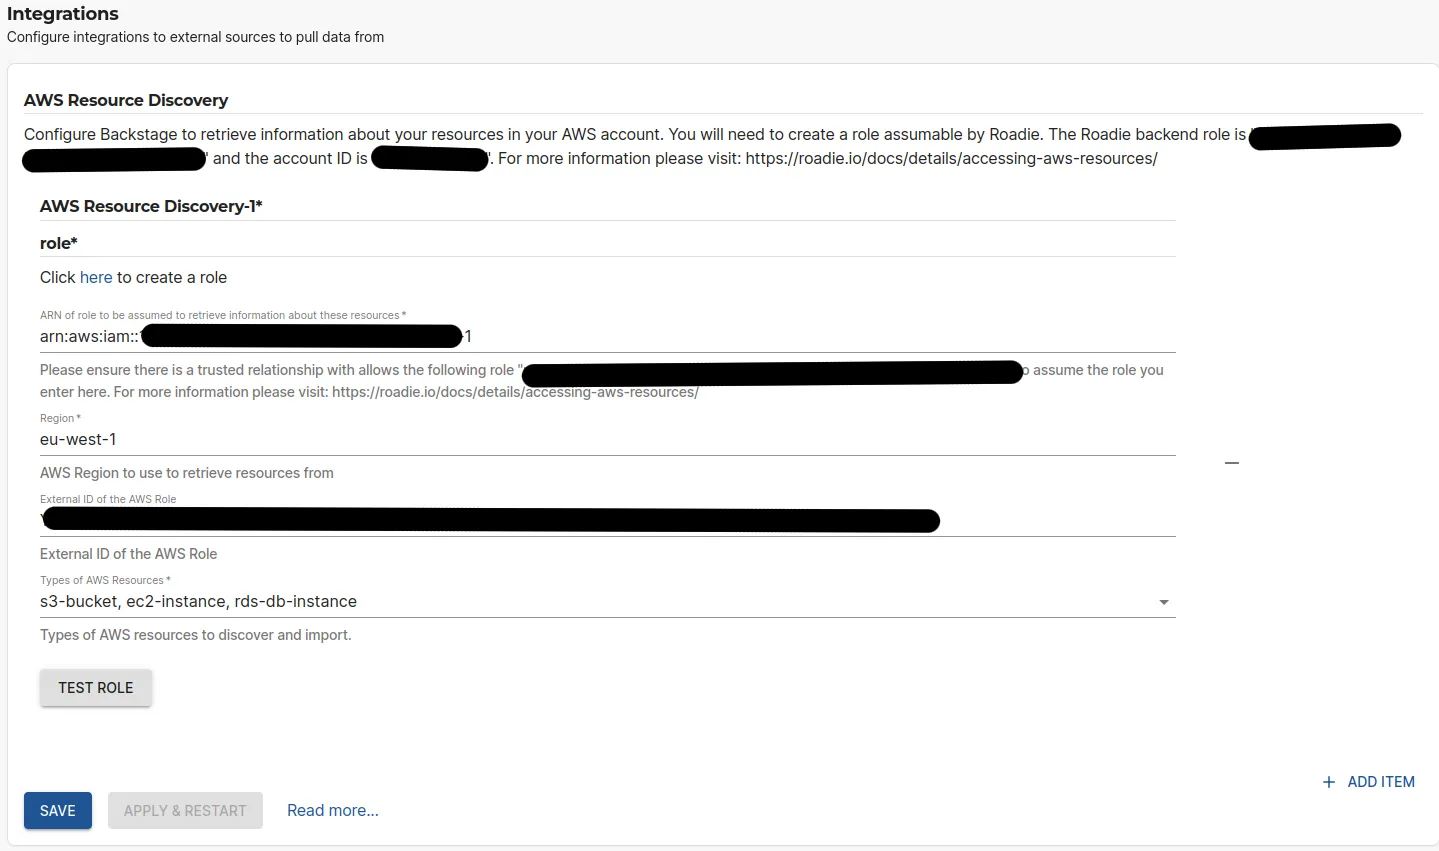
On the AWS Resources settings page Administration > Settings > AWS Resources in Roadie click Add Item.
Here you can define the role (created in step 2 above) to be used to ingest these resources, as well as the AWS region to use and the optional External ID configured for the role.
After the role configuration is done, you can click the 'Test Role' button to check if the role is assumable by Roadie. Finally, you can select the types of resources you want to be ingested. The possible options are listed in the table at the bottom of the page.
You can add multiple integrations towards multiple AWS accounts or regions.
Option 2 - AWS Organizations based autodiscovery
The Autodiscovery of AWS Accounts feature is currently in beta. Please reach out to Roadie Support to request this is enabled.
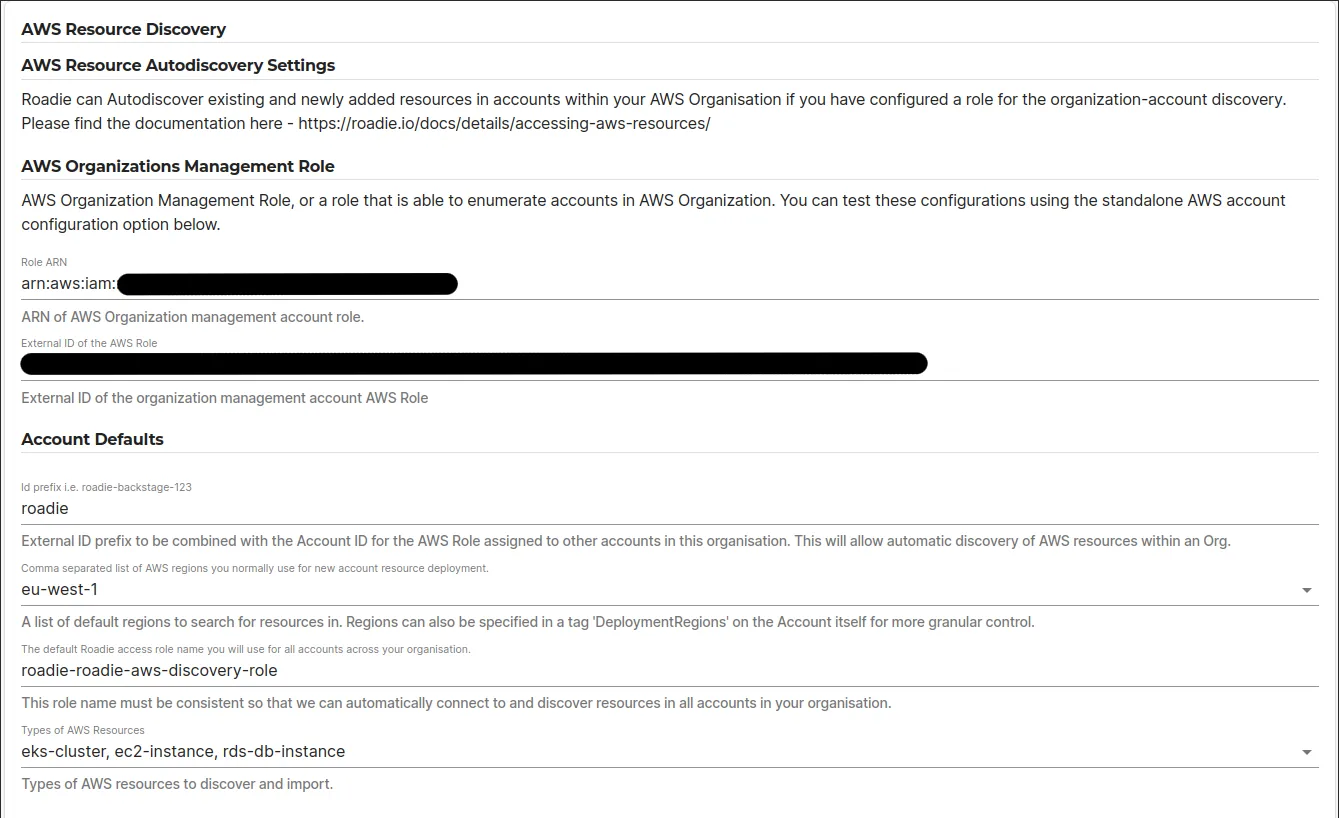
On the AWS Resources settings page Administration > Settings > AWS Resources fill out the AWS Resource Autodiscovery Settings.
In here you define 2 pieces of information:
1. AWS role with access to AWS organizations information
The AWS Organizations Management role is used to retrieve a list of AWS accounts within your AWS organization. This role should have access to the following policies:
organizations:ListAccountsorganizations:ListTagsForResource
2. Default settings to be used for each AWS account
The default settings for role assumption are the configurations that are used to assume a role on each of the AWS accounts that are discovered with the AWS Organizations Management Role. Within this settings section you can configure the regions to retrieve resources from, as well as all the resource types that should be ingested. The role name set in here must be present in each of the AWS accounts and it should have access to read the relevant chosen resources in the configured regions. You can see the needed permissions at the table in the end of this page.
The external id prefix is the same, but the external id will be different for each AWS account. Note the process on how to determine the external id from the above documentation.
For the moment all discovered AWS accounts are using the same role name and regions. if there is a need to divert from this pattern, you can add additional standalone AWS account configurations.
3. Configure individual accounts with different regions and resources
The autodiscovery option of AWS resources ingestion uses AWS organization account tags to override global configurations set up on the roadie system. With these tags you can configure more fine-grained approaches on which resources, from which regions, to ingest from specific accounts. The supported tags are as follows:
| Tag Key | Example values | Description |
|---|---|---|
resources | eks-cluster s3-bucket | Space separated list of resources to ingest from this account. See available resources in the table below |
regions | eu-west-1 eu-central-1 | Space separated AWS region codes to ingest resources from |
roadie-excluded | (Empty value) / any value | The presence of this tag indicates to skip this specific AWS account from being ingested |
Custom Entity Mapping with Nunjucks Templates
Roadie provides powerful customization capabilities for mapping AWS resources to Backstage entities using Nunjucks templating. This allows you to customize how AWS resources are transformed into Backstage catalog entities, including custom annotations, labels, metadata, and relationships.
Overview
By default, Roadie uses predefined templates for each AWS resource type to generate Backstage entities. However, you can create custom templates to:
- Add custom annotations specific to your organization
- Modify entity metadata and labels
- Establish custom relationships between entities
- Include additional AWS resource properties
- Customize entity naming and titling conventions
Enabling Custom Templates
To use custom templates for AWS resource mapping:
- Navigate to
Administration > Settings > AWS Resources - When configuring a resource type, toggle the "Use Custom Template" switch
- The template editor will appear with the default template pre-loaded
- Modify the template using Nunjucks syntax
- View the live preview of the rendered entity in the "Rendered Entity" panel
- The system validates your template and shows any schema errors
Template Variables
Each resource type provides three main variables for use in your templates:
| Variable | Description | Example |
|---|---|---|
accountId | The AWS account ID | "123456789012" |
region | The AWS region | "eu-west-1" |
data | Resource-specific properties from AWS APIs | {{ data.name }}, {{ data.arn }} |
Template Structure
Templates generate Backstage entities in YAML format with the following structure:
apiVersion: backstage.io/v1beta1
kind: Resource
metadata:
  namespace: default
  annotations:
    # Custom annotations using template variables
    amazon.com/account-id: '{{ accountId }}'
    amazon.com/region: '{{ region }}'
    # Resource-specific annotations
    amazon.com/eks-cluster-arn: '{{ data.arn }}'
  name: '{{ data.name }}'
  title: '{{ accountId }}:{{ region }}:{{ data.name }}'
  labels:
    # Custom labels
    environment: "{{ data.tags.Environment or 'unknown' }}"
spec:
  owner: "{{ data.tags.owner or 'unknown' }}"
  type: eks-cluster
  # Custom relationships
  dependsOn:
    - 'resource:default/{{ data.vpc }}'
Resource-Specific Data Properties
Each AWS resource type provides different properties in the data variable. Here are some examples:
EKS Cluster
# Available data properties include:
# data.name, data.version, data.arn, data.endpoint, data.status,
# data.roleArn, data.securityGroupId, etc.
annotations:
  kubernetes.io/api-server: '{{ data.endpoint }}'
  amazon.com/eks-cluster-version: '{{ data.version }}'
Lambda Function
# Available data properties include:
# data.FunctionName, data.FunctionArn, data.Runtime, data.Handler,
# data.Role, data.Environment.Variables, etc.
annotations:
  amazon.com/lambda-runtime: '{{ data.Runtime }}'
  amazon.com/lambda-handler: '{{ data.Handler }}'
labels:
  runtime: '{{ data.Runtime }}'
S3 Bucket
# Available data properties include:
# data.Name, data.CreationDate, data.LocationConstraint,
# data.VersioningStatus, data.Tags, etc.
annotations:
  amazon.com/s3-bucket-versioning: '{{ data.VersioningStatus }}'
labels:
  environment: '{{ data.Tags[0].Value }}'
For complete data property references, see the AWS API documentation links provided for each resource type in the permissions table above.
Advanced Templating Examples
Conditional Logic
# Use conditional statements for optional properties
annotations:
  amazon.com/kms-key: '{% if data.KmsKeyId %}{{ data.KmsKeyId }}{% endif %}'

labels:
  # Set default values for missing tags
  environment: "{{ data.Tags | selectattr('Key', 'equalto', 'Environment') | first | attr('Value') or 'development' }}"
Custom Relationships
spec:
  # Establish relationships based on AWS resource properties
  dependsOn:
    {% if data.SubnetId -%}
    - "resource:default/{{ data.SubnetId }}"
    {% endif -%}
    {% if data.SecurityGroups -%}
    {% for sg in data.SecurityGroups -%}
    - "resource:default/{{ sg.GroupId }}"
    {% endfor -%}
    {% endif %}
Dynamic Naming
metadata:
  # Custom naming conventions
  name: "{{ region }}-{{ data.name | lower | replace('_', '-') }}"
  title: "{{ data.name }} ({{ accountId }}/{{ region }})"

  # Generate labels from AWS tags
  labels:
    {% for tag in data.Tags -%}
    {{ tag.Key | lower | replace(' ', '_') }}: "{{ tag.Value }}"
    {% endfor %}
Multi-Environment Support
metadata:
  # Different namespace based on environment tag
  namespace: "{{ data.Tags | selectattr('Key', 'equalto', 'Environment') | first | attr('Value') | lower or 'default' }}"

  annotations:
    # Add cost center information
    amazon.com/cost-center: "{{ data.Tags | selectattr('Key', 'equalto', 'CostCenter') | first | attr('Value') or 'unknown' }}"
Best Practices
- Validation: Always check the "Rendered Entity" preview to ensure your template generates valid YAML
- Error Handling: Use conditional statements and default values to handle missing properties
- Consistent Naming: Maintain consistent entity naming conventions across your organization
- Documentation: Document your custom templates for team members
- Testing: Test templates with different AWS resources to ensure they work across your infrastructure
Common Use Cases
- Multi-tenancy: Organize entities by environment, team, or business unit using namespace and labels
- Cost tracking: Include cost center and billing information from AWS tags
- Security compliance: Add security-related annotations and labels for governance
- Operational metadata: Include monitoring, alerting, and operational contact information
Troubleshooting
If you encounter template errors:
- Check the error message in the red border area below the rendered entity
- Verify Nunjucks syntax using the official documentation
- Ensure all referenced data properties exist for your AWS resource type
- Validate that the rendered YAML follows Backstage entity schema requirements
- Test with simpler templates first, then gradually add complexity
Resources and needed permissions
The table below lists the permissions required of the assumable role in order for the Catalog to ingest those resource types.
| Resource | Description | AWS Policy Action(s) |
|---|---|---|
| lambda-function | AWS Lambda Functions | lambda:ListFunctions, lambda:ListTags |
| eks-cluster | AWS Elastic Kubernetes Service Clusters | eks:ListClusters, eks:DescribeCluster |
| s3-bucket | AWS Simple Storage Service Buckets | s3:ListBucket, s3:ListAllMyBuckets, s3:GetBucketTagging |
| dynamodb-table | AWS DynamoDB tables | dynamodb:ListTables, dynamodb:DescribeTable, dynamodb:ListTagsOfResource |
| ec2-instance | AWS Elastic Compute Cloud instances | ec2:DescribeInstances |
| rds-db-instance | AWS Relational Database Service instances | rds:DescribeDBInstances |
| sns-topic | AWS SNS Topics | sns:ListTopics, sns:ListTagsForResource |
| organization-account | AWS Organization Accounts | organizations:ListAccounts, organizations:ListTagsForResource |
| opensearch-domain | AWS OpenSearch Domains | es:ListDomainNames, es:DescribeDomain,es:ListTags |
| elasticache-cluster | AWS ElastiCache (Redis or Memcached) Cluster | elasticache:DescribeCacheClusters, elasticache:ListTagsForResource |
| sqs-queue | AWS SQS Queues | sqs:ListQueues, sqs:GetQueueAttributes, sqs:ListQueueTags |
| subnet | AWS VPC Subnets | ec2:DescribeSubnets |
| load-balancer | AWS Load Balancers | elasticloadbalancing:DescribeLoadBalancers, elasticloadbalancing:DescribeTags |
| security-group | AWS VPC Security Groups | ec2:DescribeSecurityGroups |
| ebs-volume | AWS EBS Volumes | ec2:DescribeVolumes |
| vpc | AWS VPC | ec2:DescribeVpcs, ec2:DescribeDhcpOptions |
| ecr-repository | AWS Elastic Container Registry | ecr:DescribeRepositories, ecr:ListTagsForResource |
You can expand the code snippet below to show an example policy document for the AWS role. You can add additional statement blocks into the policy document where multiple role policy actions are required.
Needed minimal policy
{
  "Version": "2012-10-17",
  "Statement": [
    {
      "Sid": "RoadieAllowPolicy",
      "Effect": "Allow",
      "Action": ["lambda:ListFunctions"],
      "Resource": "*"
    }
  ]
}
Additional information
The resource providers enhance their functionality to allow additional metadata inclusion to the provided entities. This is done by using tags within the AWS resource.
The tagging functionality of AWS is used to determine the owner of each resource. By default, Roadie uses tag with a key owner to determine what value to use for the owner field of the generated entity.
You can additionally use the following tags to indicate relationships within the catalog:
system -> To indicate that this AWS resources is part of a system (expected value: fully qualified name)
domain -> To indicate that this AWS resources is part of a domain (expected value: fully qualified name)
dependsOn -> To indicate that the resource depends on something (expected value: comma separated list of fully qualified names)
dependencyOf -> To indicate that the resource is a dependency of something (expected value: comma separated list of fully qualified names)
For EKS Cluster ingestion you are also able to specify the spec.type value to use when these resource entities are ingested. The default value is eks-cluster, other popular value that could be more descriptive is kubernetes-cluster.
See more information about relationships in Backstage docs .