Entity Push API
Published on February 16th, 2024Catalog your AWS accounts
In this tutorial we are going to show you how to ingest your organization’s AWS accounts into your Roadie catalog as Resource entities. For this we will use Roadie’s Entity Push API. You can check out the API docs here in the Roadie Provider section. This tutorial will hopefully serve as an example around how you might apply this same pattern to other cloud providers or other resources that you cannot currently manage with the providers available with Roadie out of the box.
Authentication
First to be able to use the Roadie entity push API we will need to get an authentication token. You can generate your own token by going to the Administration -> Account (/administration/account) page. Here go to the Roadie API Access section. Give a name to your token and press the GENERATE TOKEN button.
Make sure you copy your token and put it in a secure place.
You can test out your token by hitting the api. For example:
curl \
  -X GET \
  -H 'Accept: application/json' \
  -H "Authorization: bearer ${ROADIE_API_TOKEN}" \
  https://api.roadie.so/api/catalog/entities
Fetch your AWS accounts
Using the AWS CLI make sure you have it setup and configured. You can read more here
aws organizations list-accountsErrors
If you encounter the following error make sure you have the proper permissions configured for yourself and check if you are using your correct AWS_PROFILE
An error occurred (AccessDeniedException) when calling the ListAccounts operation: You don't have permissions to access this resource.
This will result in a response like
{
  "Accounts": [
    {
      "Arn": "arn:aws:organizations::111111111111:account/o-exampleorgid/111111111111",
      "JoinedMethod": "INVITED",
      "JoinedTimestamp": 1481830215.45,
      "Id": "111111111111",
      "Name": "Master Account",
      "Email": "[email protected]",
      "Status": "ACTIVE"
    },
    {
      "Arn": "arn:aws:organizations::111111111111:account/o-exampleorgid/222222222222",
      "JoinedMethod": "INVITED",
      "JoinedTimestamp": 1481835741.044,
      "Id": "222222222222",
      "Name": "Production Account",
      "Email": "[email protected]",
      "Status": "ACTIVE"
    },
    {
      "Arn": "arn:aws:organizations::111111111111:account/o-exampleorgid/333333333333",
      "JoinedMethod": "INVITED",
      "JoinedTimestamp": 1481835795.536,
      "Id": "333333333333",
      "Name": "Development Account",
      "Email": "[email protected]",
      "Status": "ACTIVE"
    },
    {
      "Arn": "arn:aws:organizations::111111111111:account/o-exampleorgid/444444444444",
      "JoinedMethod": "INVITED",
      "JoinedTimestamp": 1481835812.143,
      "Id": "444444444444",
      "Name": "Test Account",
      "Email": "[email protected]",
      "Status": "ACTIVE"
    }
  ]
}
Now you can use either this list directly and send the data into the Roadie Catalog via your preferred way, using plain curl command or any programming language you prefer. In the next section I’ll show you a full example with node.js.
Listing the accounts and sending the entities to Roadie
- We will use the official AWS JavaScript SDK. Make sure you have it available in your system
- Make sure you have your
ROADIE_API_TOKENavailable in your shell - Make sure you are authenticated towards your AWS.
- Make sure you are using your correct
AWS_PROFILE
We are going to fetch the available AWS accounts and then pick the data we want to put in the Resource entities and finally send these into Roadie. We are going to use the PUT /api/catalog/roadie-entities/sets/${setId} endpoint. To use this we have to provide a set id, which should be something descriptive. This provides the ability to issue subsequent requests towards the same set id and it will update all of the entities provided in the request body. This performs a full mutation, every entity in the set will be replaced by the new incoming entities in the new requests.
If you would like to remove some of the entities provided in this set you will need to issue a new request without the entity you want to delete, so the whole set will be replaced by the new array of entities you send to Roadie.
npm i @aws-sdk/client-organizationsIn this example I’ll use the native node:https package, this can be substituted by your preferred way of making an http request. (axios, node-fetch, etc..)
const https = require('node:https');
const { OrganizationsClient, ListAccountsCommand } = require('@aws-sdk/client-organizations');

const client = new OrganizationsClient();

const command = new ListAccountsCommand({});
const response = client.send(command);

response.then((r) => {
  const accounts = r.Accounts;

  if (!accounts) {
    throw new Error('No AWS Accounts found');
  }

  const templateResourceEntity = ({ name, arn }) => ({
    apiVersion: 'backstage.io/v1alpha1',
    kind: 'Resource',
    metadata: {
      name,
      description: 'AWS accounts',
      annotations: {
        'aws-account/arn': arn,
      },
    },
    spec: {
      owner: 'dx-team',
      type: 'aws-account',
    },
  });

  const entities = accounts.map((a) => templateResourceEntity({ name: a.Name, arn: a.Arn }));

  const body = JSON.stringify({ items: entities });
  const req = https.request(
    {
      hostname: 'api.roadie.so',
      port: 443,
      path: '/api/catalog/roadie-entities/sets/aws-accounts',
      method: 'PUT',
      headers: {
        'Content-Type': 'application/json',
        'Content-Length': Buffer.byteLength(body),
        Authorization: `bearer ${process.env.ROADIE_API_TOKEN}`,
      },
    },
    (res) => {
      res.on('data', (chunk) => {
        console.log(chunk);
      });
    }
  );
  req.on('error', (e) => {
    console.log(e);
  });
  req.write(body);

  req.end();
});
You will see the following response body on a successful request:
{
  "set": "aws-accounts",
  "items": [
    {
      "id": "cf71aba4-c2c5-4ba8-b274-c94c097d74be",
      "entity": {
        "kind": "Resource",
        "spec": { "type": "aws-account", "owner": "dx-team" },
        "metadata": {
          "name": "development",
          "annotations": {
            "update-me": "me",
            "aws-account/arn": "arn",
            "roadie.io/entity-set": "aws-accounts",
            "backstage.io/managed-by-location": "roadie-api:/api/catalog/roadie-entities/entities/by-ref/resource%3Adefault%2Fdevelopment",
            "backstage.io/managed-by-origin-location": "roadie-api:/api/catalog/roadie-entities/entities"
          },
          "description": "AWS accounts"
        },
        "apiVersion": "backstage.io/v1alpha1"
      },
      "entityRef": "resource:default/development",
      "rawData": {
        "kind": "Resource",
        "spec": { "type": "aws-account", "owner": "dx-team" },
        "metadata": {
          "name": "development",
          "annotations": {
            "update-me": "me",
            "aws-account/arn": "arn",
            "roadie.io/entity-set": "aws-accounts",
            "backstage.io/managed-by-location": "roadie-api:/api/catalog/roadie-entities/entities/by-ref/resource%3Adefault%2Fdevelopment",
            "backstage.io/managed-by-origin-location": "roadie-api:/api/catalog/roadie-entities/entities"
          },
          "description": "AWS accounts"
        },
        "apiVersion": "backstage.io/v1alpha1"
      },
      "set": "aws-accounts",
      "updatedBy": "user:default/guest",
      "source": "api-entity",
      "updatedAt": "2024-02-16T11:26:16.685+00:00"
    }
  ]
}
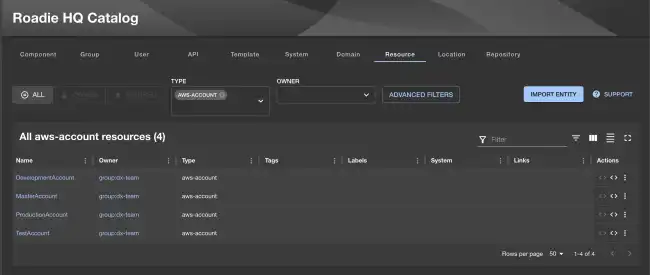
Go to your catalog page (Catalog -> Resource) and you will immedietly see these Resource entities in your catalog.

Keep it syncing
To continuously update your catalog with the changes in your AWS accounts you will need to run this script on a schedule. I advise you to use your organization’s best practice to run these scheduled jobs. Alternatively you can use the pull based roadie-agent library if you want Roadie to automatically schedule pulling these entities from your developed Roadie Agent service.
Regardless how it will run you will need to be sure that environment has the correct tokens to be able to fetch from your organization’s AWS and to be able to push to your Roadie API. Do not forget to configure your ROADIE_API_TOKEN and your AWS_PROFILE.