
Introduction
In this tutorial we are going to learn how to deploy a customized GitHub pages website with the Backstage scaffolder on Roadie.
The website we create will be...
- Created from a prepared code skeleton.
- Published from its own GitHub repo.
- Automatically deployed to the public web via GitHub pages.
- Customized with information we collect from the user when they run the scaffolder.
- Available in the Backstage catalog so others can find it.
- Automatically be hooked up to a monitoring service.
The skills you will learn include:
- How to write scaffolder code skeletons and templates.
- How to collect input from the user in the scaffolder UI, and pass it through to the codebase.
- How to make HTTP requests from the scaffolder, and use the Roadie Backstage proxy to securely add authentication to the requests.
- How to create proxies in Roadie.
This tutorial involces some steps which are specific to Roadie and won’t work on a vanilla Backstage installation. To try Roadie, apply for a free trial on our website. You will also see the best results if you are an admin of your Roadie Backstage instance.
Just show me it working!
If you'd prefer to see the scaffolder in action before working through this tutorial, you can watch this short demo video. It demonstrates the same GitHub Pages scaffolder action we create in the step that follow.
This video is part of the Backstage Bites series.
Step 1: Create a GitHub repo containing code from a skeleton directory.
A Backstage Scaffolder template will usually consist of at least two things:
- A skeleton code structure, which is used to stamp out new websites, services, or other types of component.
- A
template.yamlfile which describes the steps to run during the scaffolding process.
Create a basic skeleton and template
To get started, make a directory structure to hold our template and the code skeleton we will use to stamp out our GitHub pages website.
.
├── skeleton
│   └── index.html
└── template.yaml
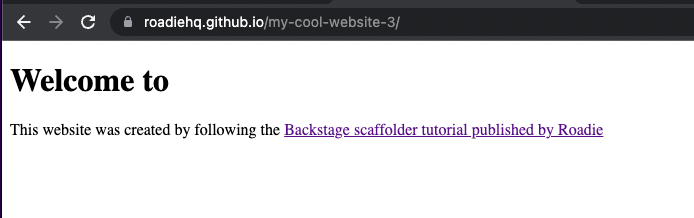
Put the following HTML into the index.html:
<!DOCTYPE html>
<html lang="en">
<head>
    <meta charset="UTF-8">
    <meta name="viewport" content="width=device-width, initial-scale=1.0">
    <title>my website</title>
</head>
<body>
  <h1>Welcome to my website</h1>
  <p>This website was created by following the <a href="https://roadie.io/blog/roadie-backstage-scaffolder-website/">Backstage scaffolder tutorial published by Roadie</a></p>
</body>
</html>
And place the following YAML into template.yaml. We’ll explore how this works at a later point in the tutorial. For now, let’s just get it working.
Optionally, you may wish to edit the spec.owner property to refernce the name of a real Group (aka. a team) in your Backstage catalog.
apiVersion: scaffolder.backstage.io/v1beta3
kind: Template
metadata:
  name: github-pages-website
  title: GitHub Pages Website
  description: Create a static HTML website and publish it via GitHub pages.

spec:
  owner: my-group-name
  type: website
  parameters:
    - title: Choose a Source Control Management tool to store your new website in.
      required:
        - repoUrl
      properties:
        repoUrl:
          title: Repository Location
          type: string
          ui:field: RepoUrlPicker
          ui:options:
            allowedHosts:
              - github.com

  steps:
    - id: template
      name: Fetch Skeleton + Template
      action: fetch:template
      input:
        url: ./skeleton

    - id: publishToGitHub
      name: Publish to GitHub
      action: publish:github
      input:
        allowedHosts: ['github.com']
        # This will be used as the repo description on GitHub.
        description: 'A static HTML website. Just like the good old days.'
        repoUrl: ${{ parameters.repoUrl }}
        defaultBranch: main
        repoVisibility: public

  output:
    remoteUrl: '{{ steps.publishToGitHub.output.remoteUrl }}'
Now that we have a basic template.yaml and skeleton, we need to push it to GitHub where the Roadie Backstage scaffolder can access it. You must install the Roadie GitHub App before proceeding. To learn how to do that, read our Getting Started docs. Turn your directory structure into a Git repository and push it to GitHub.
Import your template into Roadie Backstage
Copy the URL of the template.yaml file on GitHub and go to Roadie Backstage to import it into the catalog.
On the main catalog view, click the “CREATE COMPONENT” button, then click the “REGISTER EXISTING COMPONENT” button.
Paste the URL of the template.yaml into the URL text field and click “ANALYZE”.
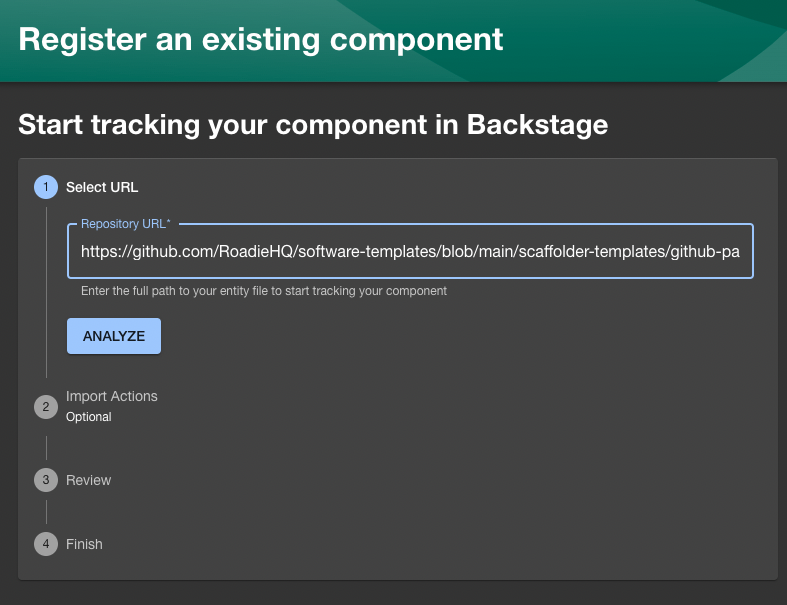
Assuming there are no errors, click the “IMPORT” button.

Great. Your template is now imported into Backstage and ready to use.
Click the “Create...” link in the Backstage sidebar to go back to the main scaffolder view. You should see your template is now available.
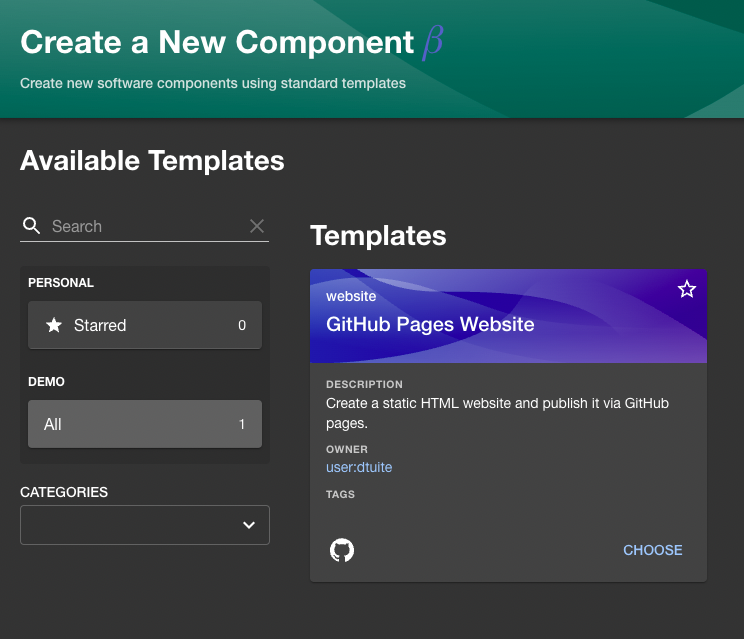
Run the template
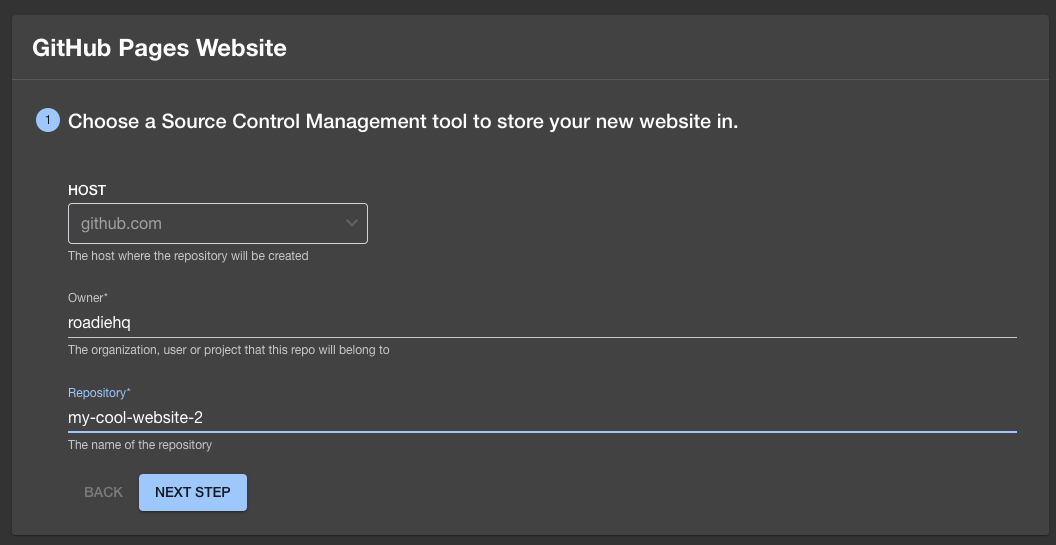
Click “CHOOSE” and you should be taken to a form like this:

Fill in the name of your GitHub Org in the “Owner” field. This template will use the Roadie Backstage GitHub app to run the scaffolder, so the Org must be the same org that the Roadie Backstage GitHub app is installed into.
Choose an arbitrary GitHub repository name and fill it into the “Repository” field. Something like “my-cool-website” will work. This repository doesn’t need to exist. The scaffolder will create it as it runs through the steps.
Click “NEXT STEP” and then “CREATE”.
After 15 or 20 seconds, you should see scaffolder logs being to appear. These logs will give you information about what the scaffolder is doing, and will display errors if failures occur.
Assuming everything worked correctly, you will see checkmarks appear in the left column of the scaffolder interface as it does its thing.
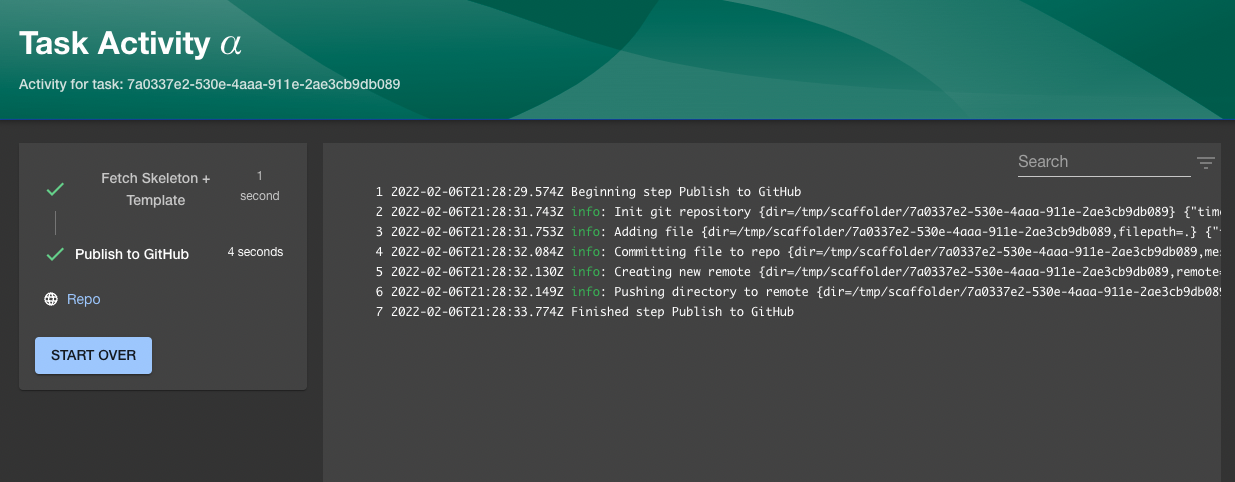
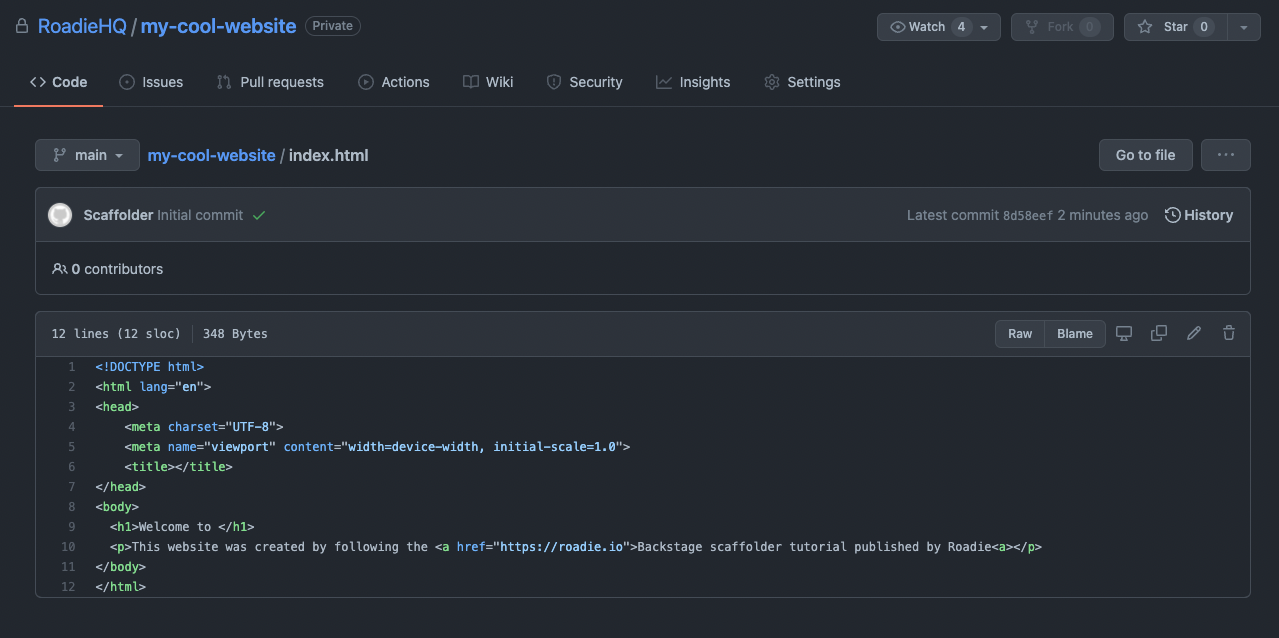
Click the link labelled “Repo” in the left sidebar to visit the GitHub repo which we just created. You should see it contains an index.html with the same content we placed in the HTML file earlier.
Step 2: Publish the site to GitHub Pages
Having a repo with some code in it is great, but it’s not a website until you can visit it in the browser.
To turn this HTML into a GitHub pages website, we can manually visit the settings of our newly created GitHub repo and click some buttons to publish the site to the web. We don’t like manual work though. Let’s see if we can do this in an automated fashion instead.
To make this work, we’re going to use the Open Source http:backstage:request scaffolder action from Roadie. You can see this package on GitHub. Don’t worry about following any of the installation steps. This package is already installed in Roadie Backstage.
This scaffolder action allows us to send HTTP requests from our template.yaml. We will use it it hit the GitHub API endpoint which can turn on GitHub pages for a GitHub repository .
Using the HTTP Backstage Request scaffolder action
Add a new step called publishToWeb to your template.yaml, commit it and push it to GitHub.
# ... spec and other properties above this point
  steps:
    # ... existing template and publishToGitHub steps here.

    - id: publishToWeb
      name: Publish to web with GitHub Pages
      action: http:backstage:request
      input:
        method: 'POST'
        path: /api/proxy/github/api/repos/${{ (parameters.repoUrl | parseRepoUrl)["owner"] }}/${{ (parameters.repoUrl | parseRepoUrl)["repo"] }}/pages
        headers:
          content-type: 'application/json'
        body:
          source:
            branch: main
            path: '/'
Let’s go through this YAML to learn what it’s doing.
- id: publishToWeb
  name: Publish to web with GitHub Pages
  action: http:backstage:request
The first three lines are relatively self explanatory. We’re adding a new step with an id and a human readable name. Then we’re declaring that we’re going to use the http:backstage:request action. If you ever want a list of all the available actions, just visit /create/actions inside Roadie Backstage.
input:
  method: 'POST'
  path: /api/proxy/github/api/repos/${{ (parameters.repoUrl | parseRepoUrl)["owner"] }}/${{ (parameters.repoUrl | parseRepoUrl)["repo"] }}/pages
  headers:
    content-type: 'application/json'
  body:
    source:
      branch: main
      path: '/'
The input is passed to the http:backstage:request action when it runs. Our input says we want to make a POST request with a particular body which satisfies the requirements of the GitHub API. We also want to pass some headers. These are the same details you might expect to see if we were calling this API endpoint with curl or Postman.
The path is interesting. Instead of calling the GitHub API directly, we’re proxying through the Roadie Backstage backend. As the request passes through Roadie Backstage, the proxy will transparently add an authentication token to the request. This means we don’t have to hardcode the authentication token into the template.yaml, or ask the user to provide it at runtime.
The first three parts of the path, /api/proxy/github/api , contain the location of the proxy on the Backstage API. Everything after github/api is the path of the API endpoint we want to hit on GitHub.
The GitHub path we want to call is /repos/[owner]/[repository]/pages. Of course, we don’t know the name of the owner and repository until the user runs the template. To work around this, we use a special syntax to parse them out at runtime.
We can get the “Owner” the user types in with ${{ (parameters.repoUrl | parseRepoUrl)["owner"] }} and we can get the “Repository” the user types in with ${{ (parameters.repoUrl | parseRepoUrl)["repository"] }}.
Storing the GITHUB_TOKEN securely
Our proxy knows how to forward requests over to GitHub, but it doesn’t yet have the correct token to be able to successfully authenticate. Lets securely store an authentication token in Roadie so the proxy can use it.
Click “Secrets” in the left sidebar of the SETTINGS tab on Roadie Backstage.
At the top of the list you should see a row for “GITHUB_TOKEN”. Visit your GitHub account settings and create a personal access token which has the pages scope. Be sure to authorize it on your GitHub org if you use SSO.
Click the pencil icon on the secrets page to open a dialog box. Paste in the personal access token you just created and click “SAVE”.
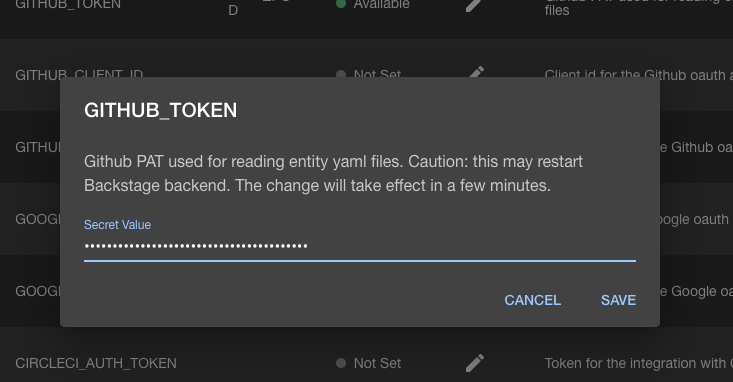
Roadie Backstage has to restart to enable this token. This can take a few seconds. Wait for the GITHUB_TOKEN table row to display a green status indicator and the text “Ready” before proceeding.
Putting it all together
Now we have a template which sends a HTTP request to a proxy and we have a secret which the proxy will use to authenticate with GitHub.
Since we pushed the new version of our template.yaml a while ago, the Backstage catalog should have already looped over it and picked up the new version with the call to the GitHub pages API in it.
Go back to your scaffolder template and fill out the details again. Remember, GitHub repos must have unique names, so if you haven’t deleted the repo you created in step 1, you’ll have to choose a different name this time.
Click “NEXT STEP” and “CREATE”.
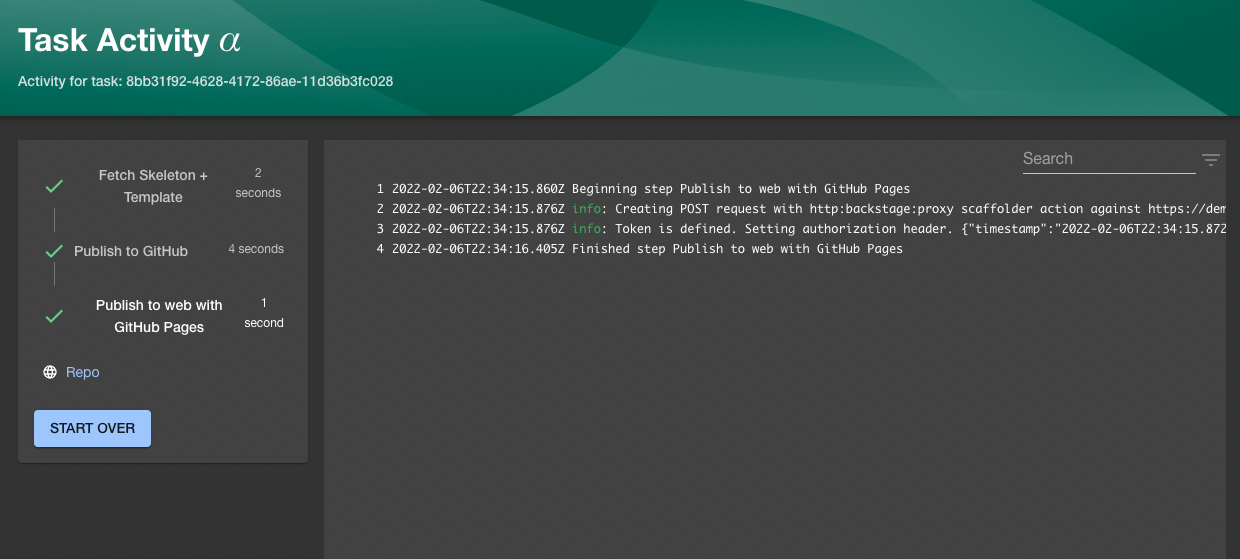
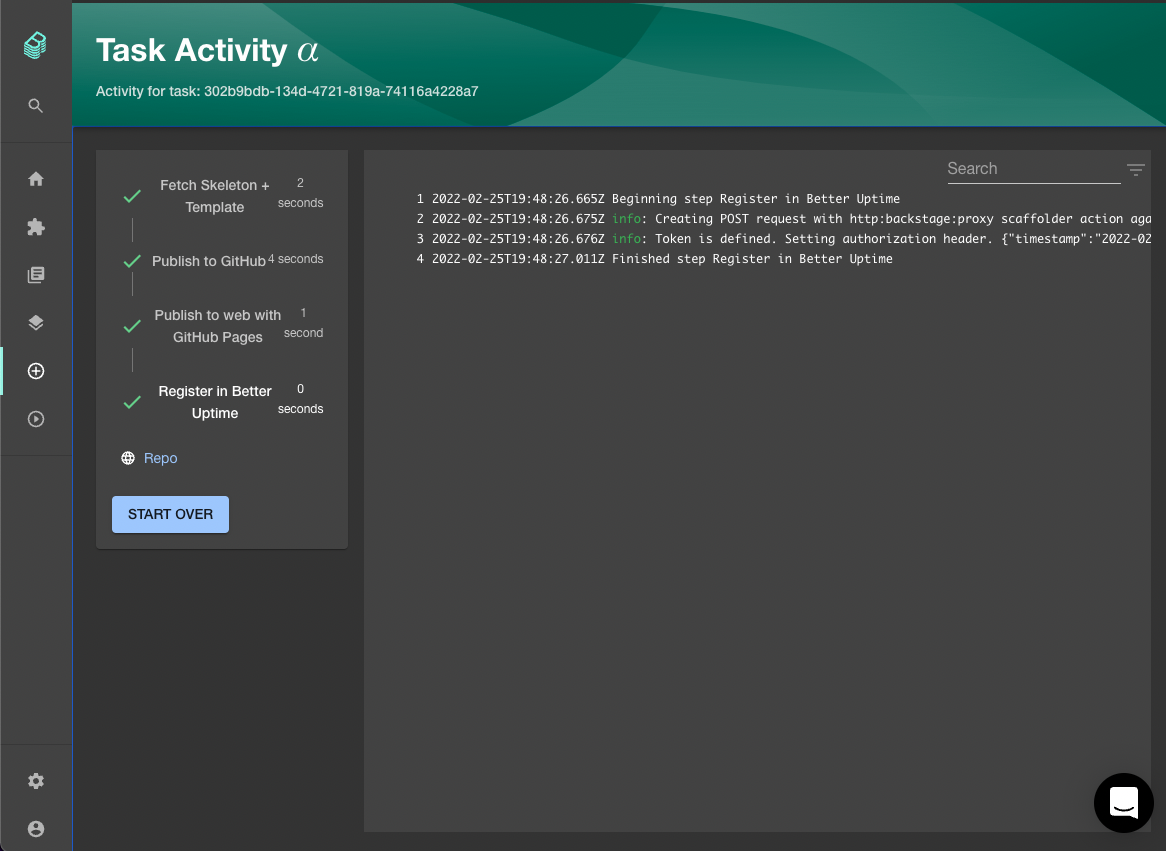
This time you should see that we have 3 steps due to run in the left sidebar of the Task Activity page. The scaffolder is going to:
- Fetch Skeleton + Template
- Publish to GitHub
- Publish to web with GitHub Pages
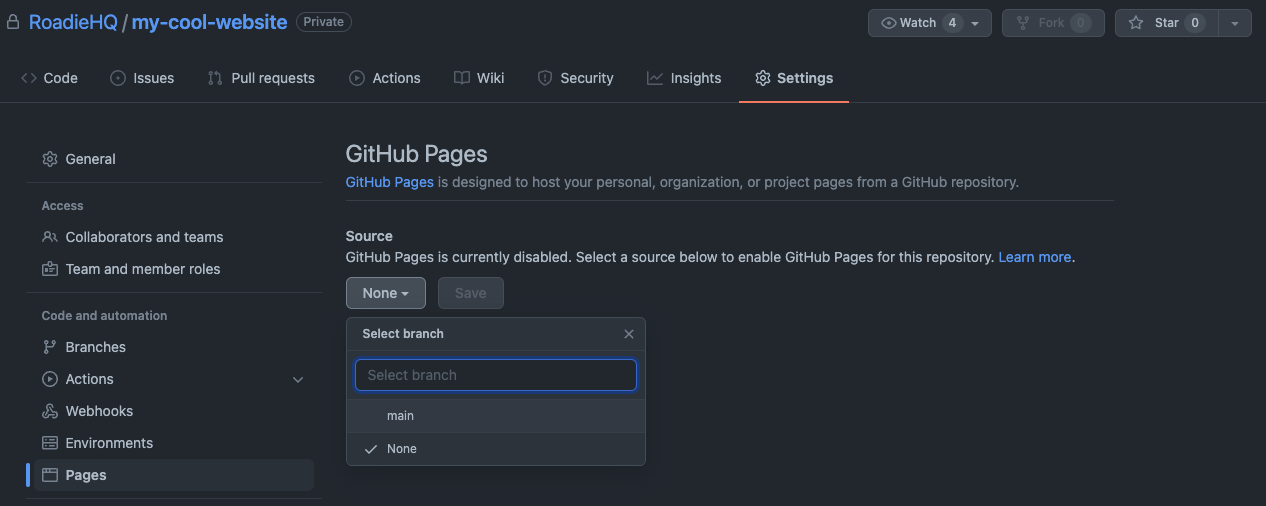
Success! Now visit the repo you just created on GitHub and go to the Pages part of the Settings.
Visit the following URL to see your new website:
https://[owner].github.io/[repository]/
It doesn’t look like much but it’s a start!
Step 3: Customize the website
Creating a website from a template is great, but it would be better if we were able to customize it a little. We don’t want our website looking exactly like hundreds of other scaffolded websites 😃.
For customization, the scaffolder lets you pass values through to the template as it is being processed. To see how this works, let’s collect a website name from the user and use it in the title tag and main heading.
First, we have to update the index.html in our website to render a value called website_name. This will be provided by the user when they run the scaffolder task.
<!DOCTYPE html>
<html lang="en">
<head>
    <meta charset="UTF-8">
    <meta name="viewport" content="width=device-width, initial-scale=1.0">
    <title>${{ values.website_name | title }}</title>
</head>
<body>
  <h1>Welcome to ${{ values.website_name }}</h1>
  <p>This website was created by following the <a href="https://roadie.io/blog/roadie-backstage-scaffolder-website/">Backstage scaffolder tutorial published by Roadie</a></p>
</body>
</html>
We also need to update our template to make it ask the user for the website name.
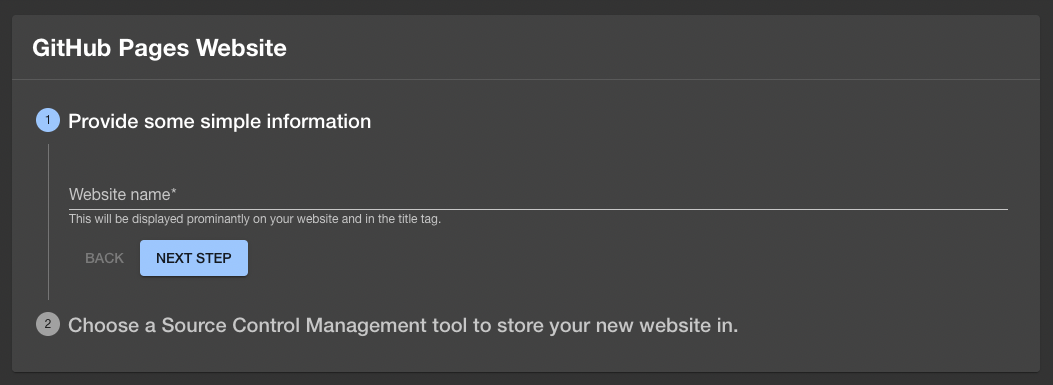
Add the following YAML to the template.yaml in the parameters section, above the item which asks for a repo owner and repository.
- title: Provide some simple information
  required:
    - website_name
  properties:
    website_name:
      title: Website name
      type: string
      description: This will be displayed prominantly on your website and in the title tag.
Finally, we need to name and pass the collected website name value down into the templating step so it is available in the index.html.
steps:
  - id: template
    name: Fetch Skeleton + Template
    action: fetch:template
    input:
      url: ./skeleton
      values:
        website_name: ${{ parameters.website_name }}
Commit and push those changes. Once the catalog refreshes the template from GitHub, you should now see a new text field in the interface. If you don’t want to wait, you can manually reimport the template to refresh it.
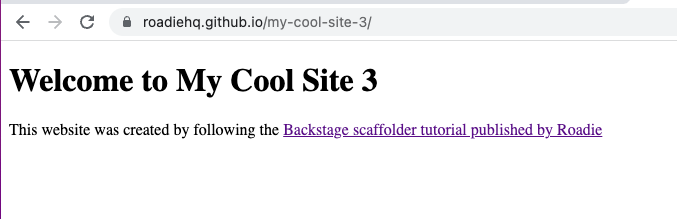
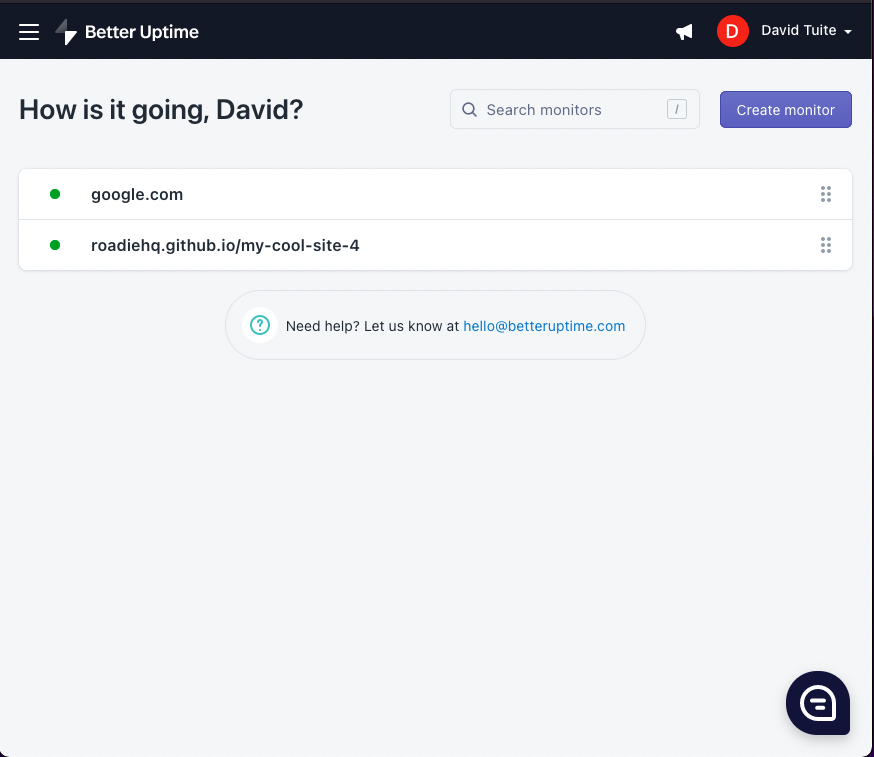
If we fill that in with a website name and proceed through the rest of the steps as before, we should eventually end up with a new GitHub pages website which has a unique name. In this example, I typed “My Cool Site 3” into the text field.
Step 4: Add a catalog-info to the new service
This new website looks promising, but it would be even better if it was automatically added to the Roadie Backstage catalog so that other people in your company could discover it.
To make this happen, we can add a catalog-info.yaml to our skeleton codebase and pass some values into it to set sensible defaults. Once this YAML file is created, we can rely on Roadie Backstage’s auto-discovery mechanism to pick it up.
Create a file named catalog-info.yaml inside the skeleton directory we created earlier. Place the following content in it:
apiVersion: scaffolder.backstage.io/v1beta3
kind: Component
metadata:
  name: ${{ values.repo_name }}
  title: ${{ values.website_name | title }}
  description: A static HTML website. Just like the good old days.
  links:
    - url: https://${{ values.repo_owner}}.github.io/${{ values.repo_name }}/
      title: Live website
  annotations:
    github.com/project-slug: ${{ values.repo_owner }}/${{ values.repo_name }}
spec:
  type: website
  owner: engineering
  lifecycle: experimental
You can see that this file relies on a few values which contain information about the website we are templating. In order to have access to these values, we need to pass them in from the template.yaml. Edit the step named “template” to pass in the values.
steps:
  - id: template
    name: Fetch Skeleton + Template
    action: fetch:template
    input:
      url: ./skeleton
      values:
        website_name: ${{ parameters.website_name }}
        repo_name: ${{ (parameters.repoUrl | parseRepoUrl)["repo"] }}
        repo_owner: ${{ (parameters.repoUrl | parseRepoUrl)["owner"] }}
Next time we run this template, we will see that an extra file called catalog-info.yaml is created in the newly scaffolded GitHub repo. Roadie Backstage’s auto discovery will automatically find this file and use it to populate the Backstage catalog.
You may notice that we have specified some links in the catalog-info.yaml. This metadata will automatically populate the Links Backstage plugin with a link to our website on the public internet. Clicking the link will take the user to GitHub pages.
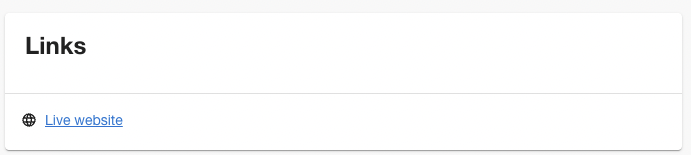
If you don’t see this card, ask a Roadie Backstage admin to add the EntityLinkCard to your website component overview page.
Step 5: Register the service with Better Uptime
Calling the GitHub Pages API was relatively simple, because there was already a proxy in place to use. But what if we want to call an authenticated endpoint which doesn’t have a default proxy?
To see how this works, we’re going to create our own proxy for the website monitoring service, Better Uptime , and then use the HTTP Request scaffolder action to setup a website ping when our scaffolder template is executed.
Roadie has no affiliation with Better Uptime. They have an easy to use UI and a free tier, which is useful for a tutorial like this.
Create a monitor in Better Uptime
The first thing you will need to do is to sign up for Better Uptime . Their free plan allows more than enough features to get through this tutorial.
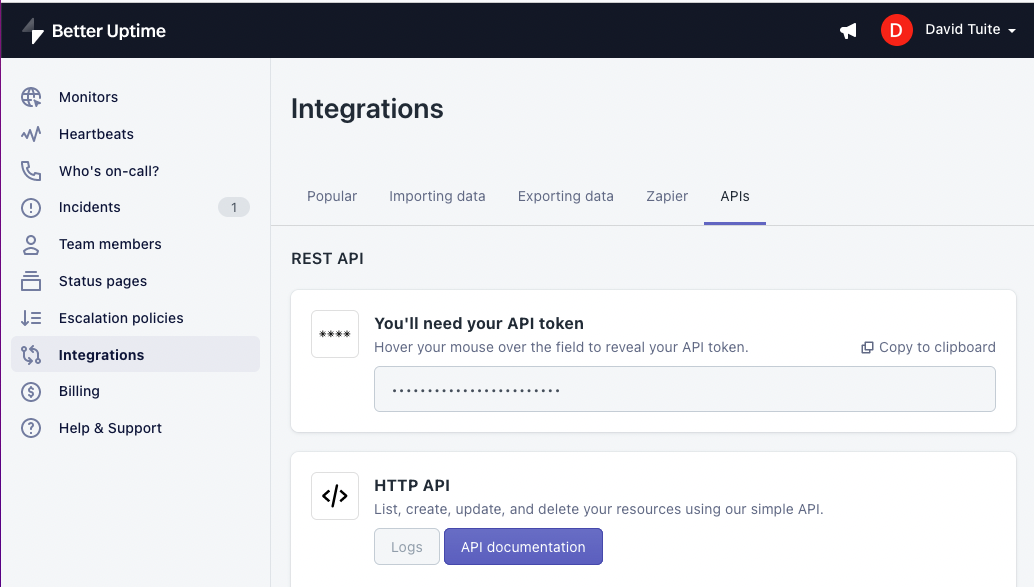
One you have an account you will need to take note of your API token. Click Integrations in the sidebar, then APIs in the secondary header. Click the Copy to clipboard link.
To see how the Better Uptime API works, let’s create a monitor for https://google.com as a test.
Run the following curl command, making sure to substitute <API_TOKEN> with the API token you copy/pasted from the Better Uptime integrations page.
curl -X POST \
     --header 'Authorization: Bearer <API_TOKEN>' \
     --header 'Content-Type: application/json' \
     --url https://betteruptime.com/api/v2/monitors
     --data '{"url":"https://google.com"}'
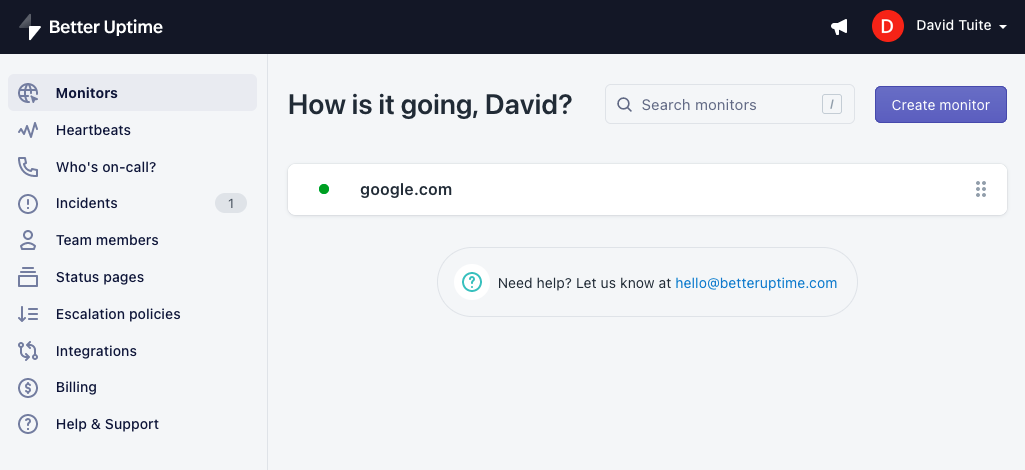
Assuming that runs successfully, you should see a monitor has been created in Better Uptime.
Now that we know how to do that with curl and Google, let's see how to do it with the scaffolder and our GitHub Pages website.
Calling the Better Uptime API from the scaffolder
To set up monitoring for the website we create with the scaffolder, all we need to do is reimplement this curl command in our template.yaml using the HTTP Backstage Request module.
The YAML step to accomplish that looks like this:
steps:
  # all of the previous steps already discussed

  - id: registerInBetterUptime
      name: Register in Better Uptime
      action: http:backstage:request
      input:
        method: 'POST'
        path: /api/proxy/betteruptime/monitors
        headers:
          content-type: 'application/json'
        body:
          url: https://${{ (parameters.repoUrl | parseRepoUrl)["owner"] }}.github.io/${{ (parameters.repoUrl | parseRepoUrl)["repo"] }}/
In this case, are sending a POST request to the path /api/proxy/betteruptime/monitors. This path doesn’t currently exist, so let’s create it using Roadie’s proxy UI.
Create a proxy for Better Uptime
To create a proxy, click “Administration” at the bottom of the main sidebar, then go to the “SETTINGS” tab and click “Proxy” in the minor left sidebar.

Click “ADD PROXY” to add a proxy.
There are a lot of fields and options available here. We don’t need to understand all of them to complete this tutorial. So we will focus on the most important ones.
“Path” is the path on which we will be able to call our proxy. This must match a part of the path we added to our template.yaml earlier. In our case, this is /betteruptime.
“Target” is the URL which we want to forward request on to. The root of the Better Uptime API is at https://betteruptime.com/api/v2, so in this case that is our Target.
Click the Advanced Settings to see some more options.
The “Allowed Methods” field can be used to restrict the HTTP methods that the proxy will accept. For example, if we choose GET and POST, then the proxy will refuse to forward DELETE requests. In this case, we only need to enable POST requests.
The “Headers” section can be used to add headers to the request as it is being forwarded on to the Target. This is how we will add an authentication token to our requests.
To make a Better Uptime proxy for our scaffolder template request, fill out the following:
- Path =
/betteruptime - Target =
https://betteruptime.com/api/v2 - Allowed Methods =
POST - Check the “Secure” and “Change Origin” checkboxes at the bottom of the page.
To add the authentication token to the request, create a header called authorization and set its value to Bearer ${CUSTOMER_TOKEN_1}. When the request is proxied, ${CUSTOMER_TOKEN_1} will be replaced with an actual token, but we don’t want to store that here in plain text. Instead, we will use Roadie’s secure secrets functionality for this.
We also need to add a Content-Type header which specifies application/json.
Our proxy settings now look something like this:

Click “SAVE” and then “APPLY & RESTART” to create the proxy. You will need to wait approximately 3 minutes for the settings to be applied.
Securely store the Better Uptime token
In the previous section, we created an authorization header with the placeholder ${CUSTOMER_TOKEN_1}. In order for this placeholder to be replaced with the actual authentication token, we have to store the token in the Roadie Secrets area, just like we did previously with the GITHUB_TOKEN.
To store the token securely, visit the Secrets page in the Roadie Backstage Administration area and set the CUSTOMER_TOKEN_1 to the value of the API token we got from Better Uptime.
Re-run the scaffolder job
Assuming those steps all worked correctly, we should now be able to re-run our scaffolder template and create a GitHub pages website which is hooked up to Better Uptime.
Go back to the Roadie Backstage scaffolder, choose your GitHub pages template and fill in the website name and GitHub owner and repo name again. Remember to use unique values. Hit CREATE and watch the magic happen.
This time, 4 steps run together, including the new Better Uptime step.
If we check out the Better Uptime monitors page, we should see that our website is registered. Initially it will be reporting as “DOWN”. That happens because it takes GitHub pages a minute or two to publish the website. Once it goes live, Better Uptime will update and go green.
Conclusion
Now that you’ve learned how to use the templates, proxy and secrets together, you should be able to apply this knowledge to other tasks. For example,
- Try to add some basic TechDocs to the skeleton so that the docs show up in Backstage automatically.
- Register the website with an error tracking tool like Sentry.
- Enable branch protection on the GitHub repo created by your scaffolder template.
The scaffolder is capable of automating all of these tasks to help your org be more productive and more standardized.
Future work in Roadie
We love this functionality already, but we also believe we have more work to do to make it the best it can be. Here are some of the areas we will be looking to improve next:
- Custom secrets so you can add your own secrets and choose their labels.
- Custom scaffolder actions so you can run completely custom code in the scaffolder.
- Open source scaffolder packages such as our utils package and an AWS package.
To learn about these new features and releases as they roll out, please join our Backstage Weekly newsletter.