
Opsgenie is Atlassian’s alerting and on call service. Many teams still use it today while they plan a move to Jira Service Management or Compass. Atlassian ended new sales on June 4, 2025. End of support is April 5, 2027. Until then, existing customers can keep running Opsgenie and migrate on their own timeline. If your Backstage is self hosted, this plugin helps you keep Opsgenie close to the work your engineers do every day.
The plugin adds a page in Backstage that shows who is on call, current alerts, and active incidents. You can search, acknowledge, or close alerts without leaving Backstage. It also exposes an incidents view with simple analytics to review patterns and responder load. On each component page, you can surface recent Opsgenie alerts so teams see signals in context while they work on that service. The result is faster triage, clearer handoffs, and less context switching for responders.
This team write up describes a real world use of the plugin.

Installation Instructions
These instructions apply to self-hosted Backstage only. To use this plugin on Roadie, visit the docs.
Install the frontend package
cd packages/app
yarn add @k-phoen/backstage-plugin-opsgenie
Configure the proxy and Opsgenie domain
Add this to app-config.yaml
# app-config.yaml
proxy:
  '/opsgenie/api':
    # Use target: https://api.eu.opsgenie.com for an EU account
    target: https://api.eu.opsgenie.com
    headers:
      Authorization: GenieKey ${OPSGENIE_API_KEY}

opsgenie:
  # Use domain: https://myorganization.app.eu.opsgenie.com/ for an EU account
  domain: https://myorganization.app.opsgenie.com/
Provide the API key through an environment variable
# example local env file
# packages/backend/.env or root .env
OPSGENIE_API_KEY=your_opsgenie_api_key
Enable the proxy in the legacy backend
Check packages/backend has the proxy plugin wired. If not, add these files
Create packages/backend/src/plugins/proxy.ts
import { createRouter } from '@backstage/plugin-proxy-backend';
import { PluginEnvironment } from '../types';

export default async function createPlugin(env: PluginEnvironment) {
  return await createRouter({
    config: env.config,
    logger: env.logger,
    discovery: env.discovery,
  });
}
Register it in packages/backend/src/index.ts
import proxy from './plugins/proxy';

// inside main bootstrap where apiRouter is created
apiRouter.use('/proxy', await proxy(env));
Enable the proxy in the new backend system
Add the dependency in the backend package
cd packages/backend
yarn add @backstage/plugin-proxy-backend
Register the plugin in packages/backend/src/index.ts
import { createBackend } from '@backstage/backend-defaults';
import { proxyPlugin } from '@backstage/plugin-proxy-backend';

const backend = createBackend();

backend.add(proxyPlugin());

backend.start();
Expose the Opsgenie page in the app
Add a route in packages/app/src/App.tsx
import React from 'react';
import { FlatRoutes } from '@backstage/core-app-api';
import { Route } from 'react-router';
import { OpsgeniePage } from '@k-phoen/backstage-plugin-opsgenie';

// other imports

const AppRoutes = () => (
  <FlatRoutes>
    {/* other routes */}
    <Route path="/opsgenie" element={<OpsgeniePage />} />
    {/* other routes */}
  </FlatRoutes>
);

export default AppRoutes;
Add a link in the sidebar so people can find it
// packages/app/src/components/Root/Root.tsx
import React, { PropsWithChildren } from 'react';
import ReportProblemIcon from '@material-ui/icons/ReportProblem';
import { SidebarPage, Sidebar, SidebarItem } from '@backstage/core-components';

// other imports

export const Root = ({ children }: PropsWithChildren<{}>) => (
  <SidebarPage>
    <Sidebar>
      {/* other items */}
      <SidebarItem icon={ReportProblemIcon} to="opsgenie" text="Incidents" />
      {/* other items */}
    </Sidebar>
  </SidebarPage>
);
Show alerts on an entity page
Add the card component in packages/app/src/components/catalog/EntityPage.tsx
import React from 'react';
import Grid from '@material-ui/core/Grid';
import { EntityAboutCard, EntityLinksCard, EntityHasSubcomponentsCard } from '@backstage/plugin-catalog';
import { EntitySwitch } from '@backstage/plugin-catalog';
import {
  EntityOpsgenieAlertsCard,
  isOpsgenieAvailable,
} from '@k-phoen/backstage-plugin-opsgenie';

// other imports

const overviewContent = (
  <Grid container spacing={3} alignItems="stretch">
    <Grid item md={6}>
      <EntityAboutCard variant="gridItem" />
    </Grid>
    <Grid item md={6}>
      {/* OpsGenie alert card start */}
      <EntitySwitch>
        <EntitySwitch.Case if={isOpsgenieAvailable}>
          <EntityOpsgenieAlertsCard title="OpsGenie — Alerts" />
        </EntitySwitch.Case>
      </EntitySwitch>
      {/* OpsGenie alert card end */}
    </Grid>
    <Grid item md={4} xs={12}>
      <EntityLinksCard />
    </Grid>
    <Grid item md={8} xs={12}>
      <EntityHasSubcomponentsCard variant="gridItem" />
    </Grid>
  </Grid>
);

export default overviewContent;
Add an annotation to the entity so alerts match your service
# catalog-info.yaml
metadata:
  annotations:
    opsgenie.com/component-selector: 'tag:"service:my-awesome-service"'
This selector accepts any valid Opsgenie alert search query
Show who is on call on an entity page
Add the on call list card in packages/app/src/components/catalog/EntityPage.tsx
import React from 'react';
import Grid from '@material-ui/core/Grid';
import { EntityAboutCard, EntityLinksCard, EntityHasSubcomponentsCard } from '@backstage/plugin-catalog';
import { EntitySwitch } from '@backstage/plugin-catalog';
import {
  EntityOpsgenieOnCallListCard,
  isOpsgenieOnCallListAvailable,
} from '@k-phoen/backstage-plugin-opsgenie';

// other imports

const overviewContent = (
  <Grid container spacing={3} alignItems="stretch">
    <Grid item md={6}>
      <EntityAboutCard variant="gridItem" />
    </Grid>
    <Grid item md={6}>
      {/* OpsGenie on call list start */}
      <EntitySwitch>
        <EntitySwitch.Case if={isOpsgenieOnCallListAvailable}>
          <EntityOpsgenieOnCallListCard title="OpsGenie Who Is On-Call" />
        </EntitySwitch.Case>
      </EntitySwitch>
      {/* OpsGenie on call list end */}
    </Grid>
    <Grid item md={4} xs={12}>
      <EntityLinksCard />
    </Grid>
    <Grid item md={8} xs={12}>
      <EntityHasSubcomponentsCard variant="gridItem" />
    </Grid>
  </Grid>
);

export default overviewContent;
Add an annotation to map the entity to an Opsgenie team
# catalog-info.yaml
metadata:
  annotations:
    opsgenie.com/team: 'Awesome Team'
Optional analytics settings
You can tune business hours for the analytics page
# app-config.yaml
opsgenie:
  analytics:
    businessHours: { start: 9, end: 18 }
Things to Know
The OpsGenie plugin is a frontend plugin that displays OpsGenie alerts, incidents and on-call information in Backstage. The plugin includes two components that can be integrated into Backstage:
- The OpsGeniePage routable extension component which produces a standalone page with the following capabilities:
- view a summary of who is currently on call
- view and search a list of active alerts with the option of acknowledging or closing alerts directly from Backstage
- view and search a list of incidents
- The EntityOpsgenieAlertsCard component which can display recent alerts for a specific component.
Creating an OpsGenie API key
An OpsGenie API key with full access rights is required for the plugin to connect to your OpsGenie domain. Write access is required to allow the plugin to make updates, for example to be able to acknowledge an alert directly from Backstage.
An API key can be created within the Settings area of your OpsGenie account:

Save your API key to the OPSGENIE_API_KEY environment available to make it available to the plugin.
Display alerts on the component overview page
The EntityOpsgenieAlertsCard component can be added to EntityPage.tsx to display a list of the most recent alerts for components that have the an OpsGenie annotation. For example, to add the alert card to the Overview tab:
-
Add the
EntityOpsgenieAlertsCardcomponent toEntityPage.tsx:typescript// packages/app/src/components/catalog/EntityPage.tsx import { EntityOpsgenieAlertsCard, isOpsgenieAvailable } from '@k-phoen/backstage-plugin-opsgenie'; // ... const overviewContent = ( <Grid container spacing={3} alignItems="stretch"> <Grid item md={6}> <EntityAboutCard variant="gridItem" /> </Grid> <Grid item md={6}> {/* OpsGenie alert card start */} <EntitySwitch> <EntitySwitch.Case if={isOpsgenieAvailable}> <EntityOpsgenieAlertsCard title="OpsGenie Alerts" /> </EntitySwitch.Case> </EntitySwitch> {/* OpsGenie alert card end */} </Grid> <Grid item md={4} xs={12}> <EntityLinksCard /> </Grid> <Grid item md={8} xs={12}> <EntityHasSubcomponentsCard variant="gridItem" /> </Grid> </Grid> ); -
Add the OpsGenie annotation to the component's
catalog-info.yamlfile:yamlmetadata: annotations: opsgenie.com/component-selector: 'tag:"service:backstage-sample-service"' -
Log into app.opsgenie.com and create an alert on the Alerts tab.
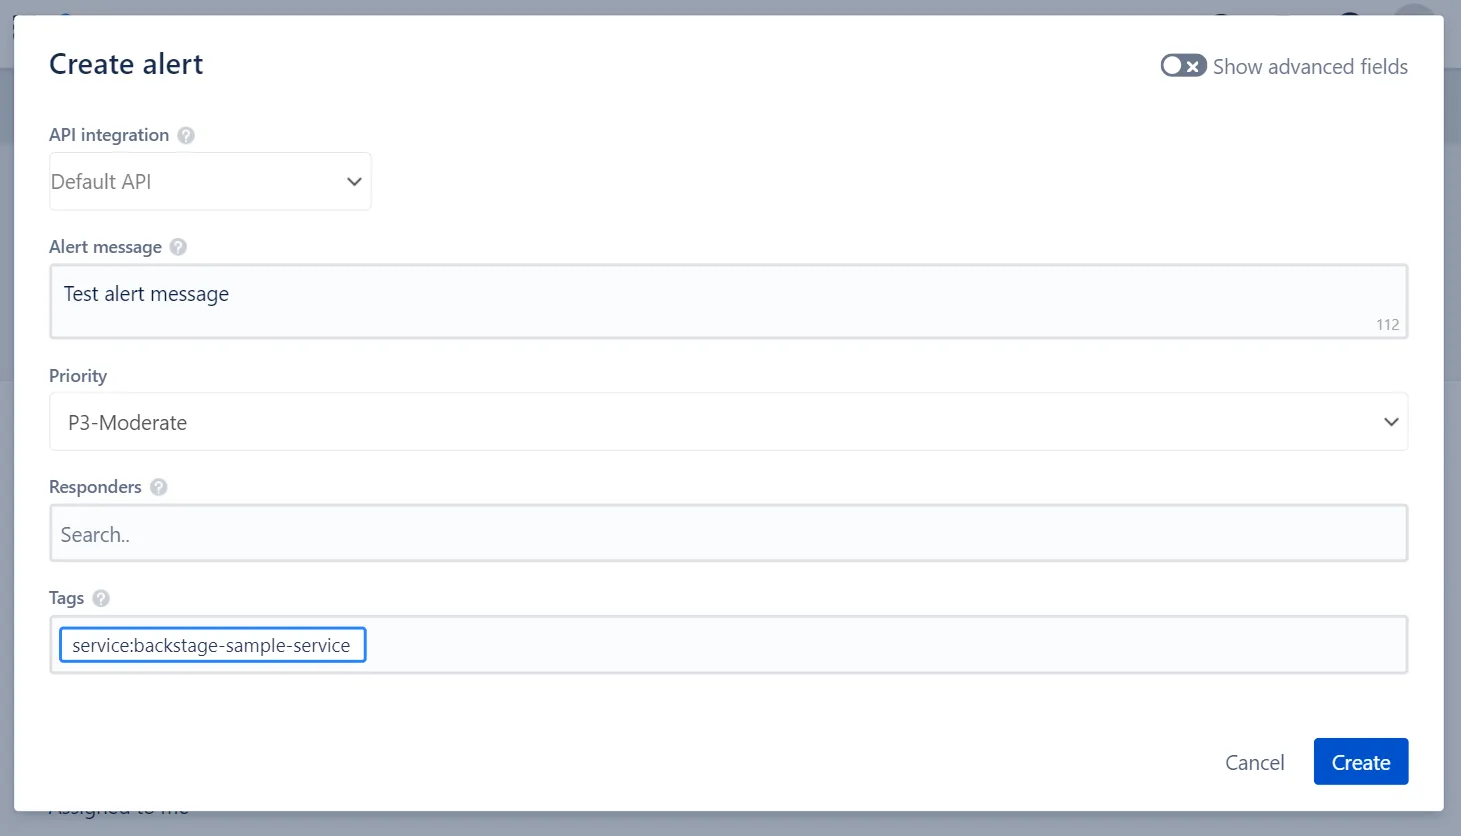
Make sure the alert's tag matches the tag in the annotation added in step 2.
-
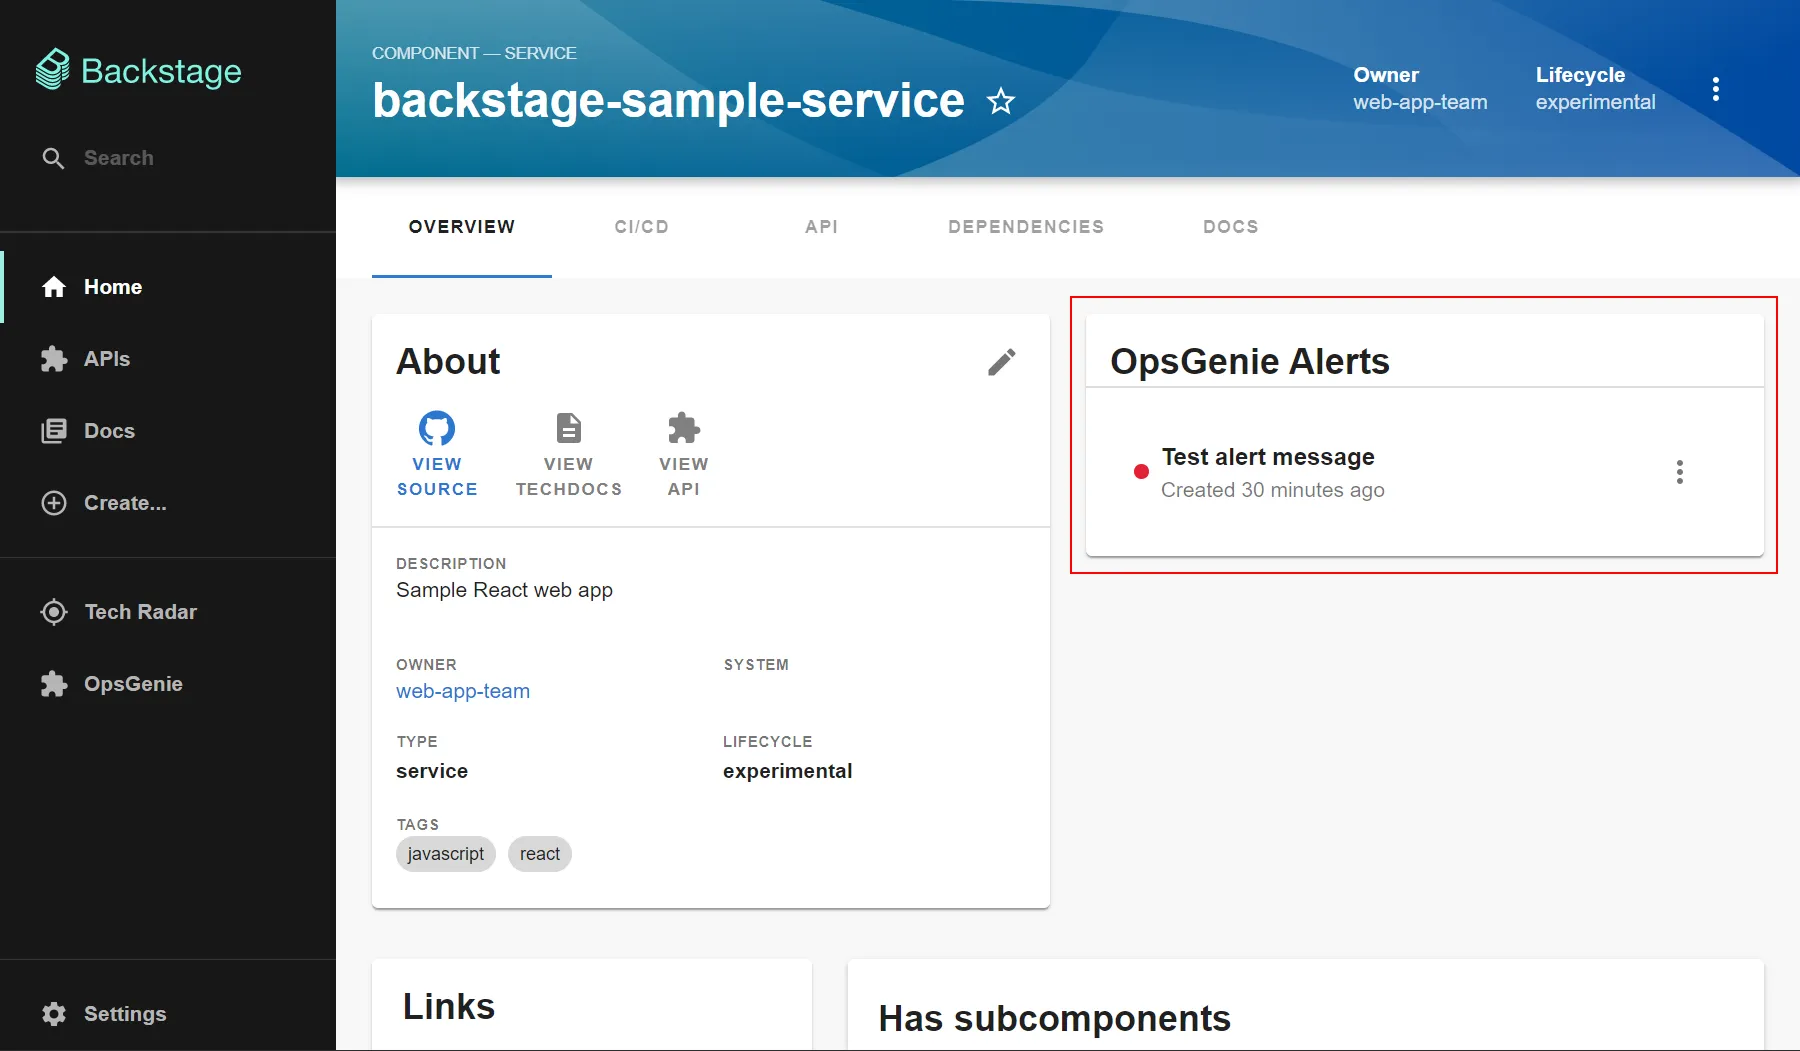
View the component in Backstage to see the list of alerts:


Changelog
The OpsGenie plugin has not seen any significant changes since almost 2 years ago.
Set up Backstage in minutes with Roadie
Focus on using Backstage, rather than building and maintaining it.