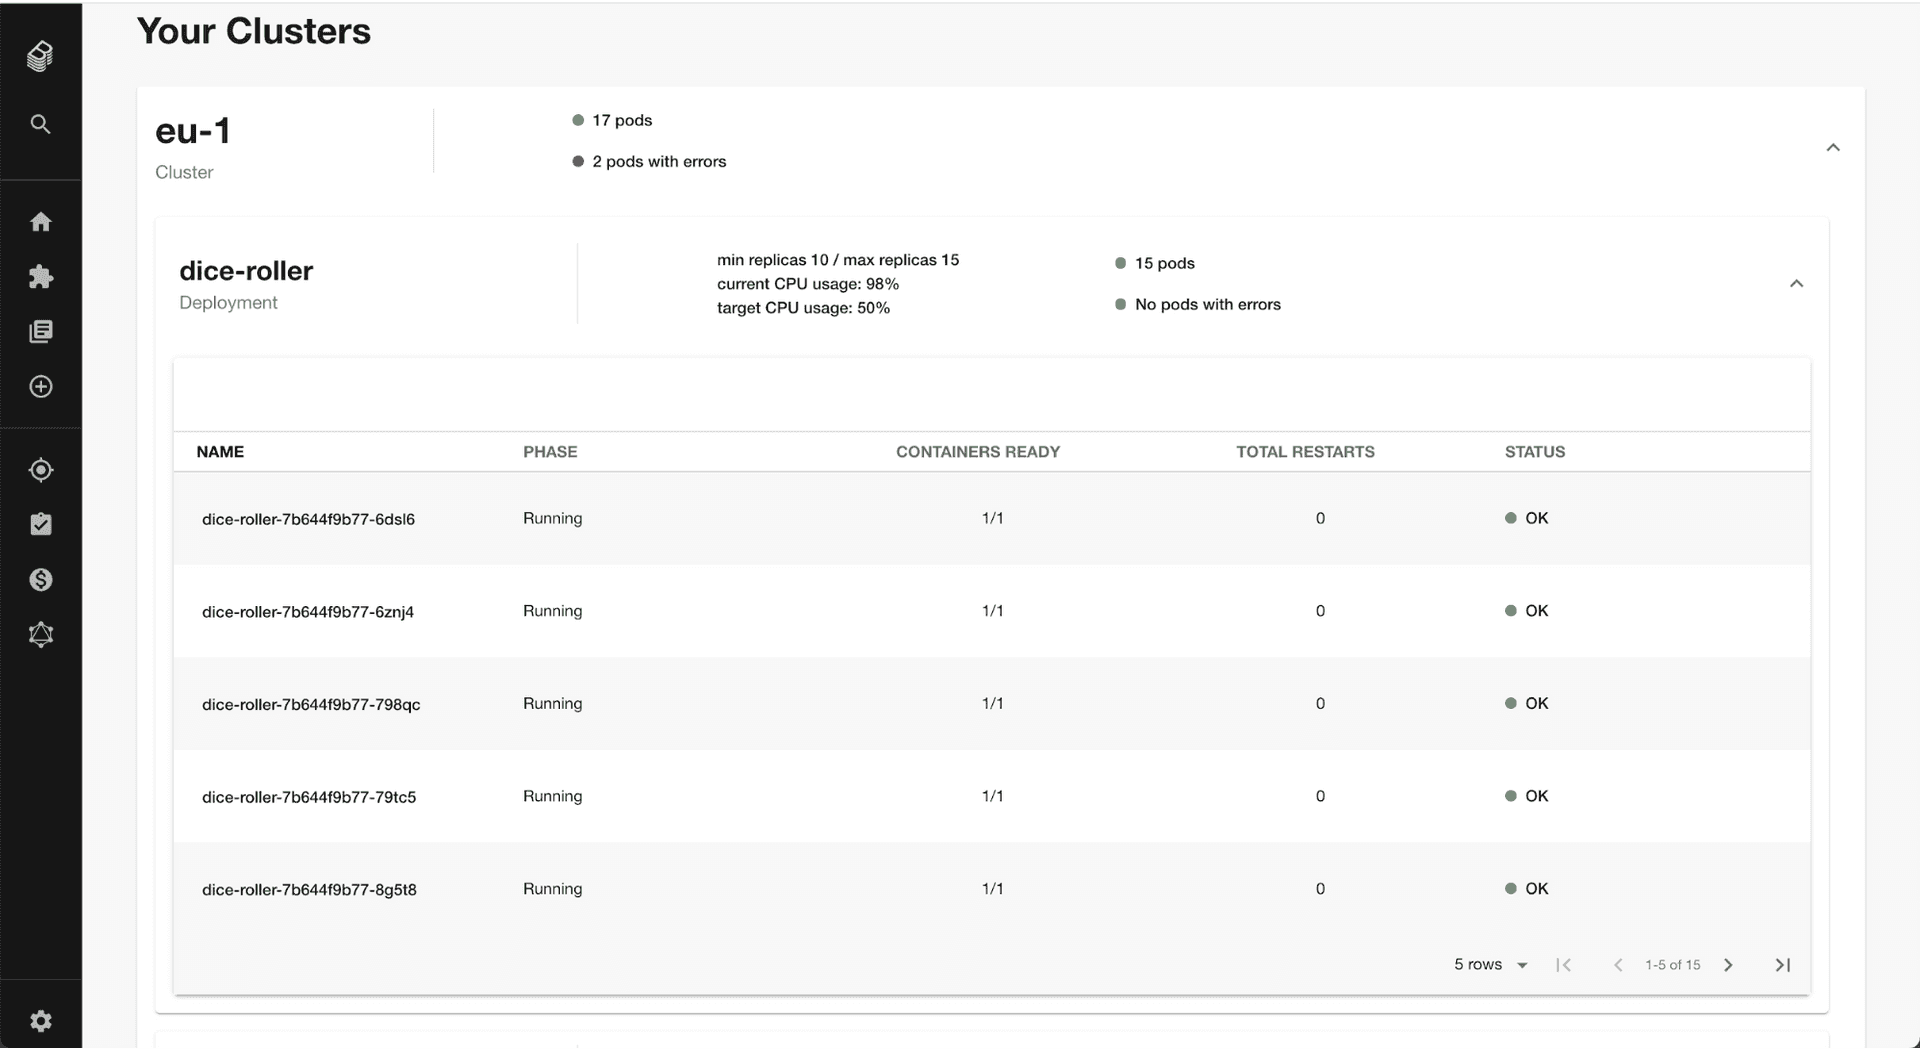
See the Kubernetes Backstage plugin in action
Installation steps
The Kubernetes plugin is made up of @backstage/plugin-kubernetes and @backstage/plugin-kubernetes-backend. To make it work, you will need to install and configure them.
Install the Kubernetes frontend plugin into Backstage.
cd packages/app
yarn add @backstage/plugin-kubernetes
Add plugin API to your Backstage instance.
// packages/app/src/components/catalog/EntityPage.tsx
import { EntityKubernetesContent } from '@backstage/plugin-kubernetes';

const serviceEntityPage = (
  <EntityLayoutWrapper>
    // ...
    <EntityLayout.Route path="/kubernetes" title="Kubernetes">
      <EntityKubernetesContent />
   </EntityLayout.Route>
  <EntityLayoutWrapper>
);
Install the Kubernetes Backend plugin into Backstage.
cd packages/backend
yarn add @backstage/plugin-kubernetes-backend
Create a new file called kubernetes.ts with the following content.
// packages/backend/src/plugins/kubernetes.ts
import { createRouter } from '@backstage/plugin-kubernetes-backend';
import { PluginEnvironment } from '../types';

export default async function createPlugin({
  logger,
  config,
}: PluginEnvironment) {
  return await createRouter({ logger, config });
}
Import the plugin.
// packages/backend/src/index.ts
import kubernetes from './plugins/kubernetes';

const kubernetesEnv = useHotMemoize(module, () => createEnv('kubernetes'));

apiRouter.use('/kubernetes', await kubernetes(kubernetesEnv));
Found a mistake? Update these instructions.
Things to know
The Backstage Kubernetes plugin has two separate components:
- frontend: it will take care of displaying the information to the user.
- backend: it will take care of connecting to the Kubernetes clusters and sending the information to the frontend.
After installing the plugins, you have to configure them in two steps:
- Allow the backend to collect objects from your Kubernetes cluster(s).
- Surfacing your Kubernetes objects in catalog entities
Configuring Kubernetes Clusters
Here is a complete example of a configuration entry:
# app-config.yaml
kubernetes:
  serviceLocatorMethod: 'multiTenant'
  clusterLocatorMethods:
    - 'config'
  clusters:
    - url: http://127.0.0.1:9999
      name: minikube
      authProvider: 'serviceAccount'
      serviceAccountToken:
        $env: K8S_MINIKUBE_TOKEN
    - url: http://127.0.0.2:9999
      name: gke-cluster-1
      authProvider: 'google'
You can find the complete list of fields in the the official Backstage documentation.
Using RBAC Authorization
The current RBAC permissions required are read-only cluster wide, for the following objects:
- pods
- services
- configmaps
- deployments
- replicasets
- horizontalpodautoscalers
- ingresses
An example of a Role to grant read access to pods:
apiVersion: rbac.authorization.k8s.io/v1
kind: Role
metadata:
  namespace: default
  name: pod-reader
rules:
  - apiGroups: ['']
    resources: ['pods']
    verbs: ['get', 'watch', 'list']
Surfacing your Kubernetes components as part of an entity
There are two ways to surface your Kubernetes components as part of an entity.
NOTE: The label selector takes precedence over the annotation/service id.
Common backstage.io/kubernetes-id label
The following annotation must be added so that Backstage can detect that an entity has Kubernetes components.
# catalog-info.yaml
metadata:
    annotations:
        'backstage.io/kubernetes-id': <ENTITY_NAME>
...In order for your Kubernetes components to show up in the service catalog as a part of an entity, your Kubernetes components themselves can have the following label:
"metadata": {
  "labels": {
    "backstage.io/kubernetes-id": <ENTITY_NAME>
    ...
  }
}
Label selector query annotation
Via a label selector, the user can identify a set of objects.
You can write your own custom label selector query that Backstage will use to
lookup the objects. You can read
Labels and Selectors documentation
for more info.
# catalog-info.yaml
annotations:
  'backstage.io/kubernetes-label-selector': 'app=my-app,component=front-end'
Example of steps to follow
-
Get the Kubernetes master base url
kubectl cluster-info -
Get the service account token
kubectl get secret $(kubectl get sa <SERVICE_ACCOUNT_NAME> -o=json \ | jq -r '.secrets[0].name') -o=json \ | jq -r '.data["token"]' \ | base64 --decode \ | pbcopy -
Register existing component in Backstage
# catalog-info.yaml apiVersion: backstage.io/v1alpha1 kind: Component metadata: name: <ENTITY_NAME> annotations: 'backstage.io/kubernetes-id': <ENTITY_NAME> spec: type: service lifecycle: production owner: guest -
Add or update
app-config.local.yamlwith the following:# app-config.local.yaml kubernetes: serviceLocatorMethod: 'multiTenant' clusterLocatorMethods: - 'config' clusters: - url: <KUBERNETES_MASTER_BASE_URL_FROM_STEP_1> name: minikube serviceAccountToken: <TOKEN_FROM_STEP_2> authProvider: 'serviceAccount'
Prefer a no-code Backstage setup?
Become a Backstage expert
To get the latest news, deep dives into Backstage features, and a roundup of recent open-source action, sign up for Roadie's Backstage Weekly. See recent editions.
